ESP Audio Scheduler — User Manual
Automatic audio scheduling for multi-zone amplifiers
| Manual version | 1.2 |
| Last updated | October 2026 |
| Applies to firmware | 0.3.1 or newer |
| Contact | marcello.alte [at] elektroakustik-alte [dot] de |
New in firmware 0.3.1 (release notes) — includes everything from 0.3.0:
- Up to 4 amplifiers per scheduler, each with its own card — see 8.1
- Zone groups, also across amplifiers; a group switch at the top of the scheduler page shows one group at a time — see 7 and 8.3
- Settings save automatically; only the network is set with “Apply”
- The settings page is now called Settings, with the areas Overview, Audio Amplifiers and System – ESP Scheduler
- Reworked event editor, red lamps for muted zones and a more compact phone layout — see 5.2 and 6.1
- Updates only at the push of a button: the device reports new firmware with a yellow dot on the gear and never installs on its own — see 10
Contents
- Product overview
- Requirements
- Quick start in 5 steps
- Setup
- The dashboard
- Creating and managing events
- Zones and colors
- Settings reference
- Checking device health
- Software updates and rollback
- Backup (CSV)
- Troubleshooting
- Technical data
- Legal
1. Product overview
The ESP Audio Scheduler is a standalone scheduling controller for multi-zone installation amplifiers that speak the Pascal Audio control protocol (e.g. Blaze Audio, PASCAL and Sonance amplifiers with the “Open API for Installers”). Connected to the same LAN as the amplifier, it switches the amplifier’s audio zones fully automatically on a weekly schedule:
- Switching zones on and off — always with a smooth fade instead of a hard cut
- Target volume per zone and event
- Input source per zone and event (e.g. radio in the morning, media player at night)
Everything is operated through a web interface in your browser — from a PC, tablet or phone, no app required. Once configured, the device runs entirely on its own: no computer, no cloud.
Features at a glance
- Weekly schedule with up to 100 events, each with freely selectable weekdays and time
- Per event and zone: individual volume (0–100) and input; on/off applies per event to all selected zones
- Week and list views with conflict detection and live clock
- Separately adjustable fade times for switching on, switching off and volume changes
- Up to 4 amplifiers per scheduler, found automatically on the network (mDNS)
- Zone groups to organize the zones of all amplifiers, also across amplifiers
- Zone colors for quick orientation (assigned automatically, customizable)
- CSV export/import of the complete schedule for backups; the full backup also keeps amplifiers and groups
- Settings save automatically — only network changes are confirmed with “Apply”
- Clock set automatically from the internet (NTP, recommended) or manually
- One-click over-the-air updates (the device reports new versions but never installs on its own) including protection against faulty firmware (automatic rollback)
- Bilingual interface (German/English), light and dark theme
2. Requirements
| Component | Requirement |
|---|---|
| Amplifier | Multi-zone amplifier with the Pascal Audio control protocol (“Open API”, TCP port 7621), e.g. Blaze PowerZone, PASCAL IP and Sonance DSP series |
| Network | Ethernet LAN; scheduler and amplifier on the same network |
| Power | PoE (802.3af) through the network cable or 5 V via USB |
| Time | Internet access for automatic time synchronization (NTP) — recommended. Alternatively the clock can be set manually (see 8.5). Without a valid clock no events fire |
| Updates | Internet access (HTTPS) for software updates |
| Operation | A current browser (Chrome, Firefox, Safari, Edge) on PC, tablet or phone |
3. Quick start in 5 steps
- Connect: Plug the network cable into the scheduler (with PoE this also powers it; otherwise add a USB power supply).
- Open: Browse to
http://esp-audio-scheduler.local(alternatives in 4.2). - Connect the amplifier: Gear icon ⚙ → Audio Amplifiers section → amplifier card → “Search amplifiers” → click the discovered amplifier — it is saved right away. Add further amplifiers (up to 4) with “+ Add amplifier”.
- Verify: In the Overview, the dots for Amplifier Target and NTP must be green.
- Create your first event: Back on the dashboard → + → pick time and days, add zones, enter a name → Save. Done — the system now switches itself.
4. Setup
4.1 Connecting
The scheduler has an Ethernet port. Connect it to a switch/router on the same network as the amplifier.
- With a PoE switch: one cable is enough — data and power come through the network cable.
- Without PoE: additionally connect a 5 V USB power supply.
The device is ready a few seconds after power-up.
4.2 Finding the web interface
Three ways, try them in order:
- Device name: open
http://esp-audio-scheduler.localin your browser (works on most home and office networks). - Router: look for “esp-audio-scheduler” in your router’s device list and open the IP address shown there.
- Fallback address: if the network has no DHCP server, the device assigns itself
http://192.168.64.123after about 20 seconds. In that case, temporarily give your computer an address in the 192.168.64.x range to reach it.
Tip: For permanent installations, use a fixed IP address — either as a DHCP reservation in the router or directly on the device (see 8.4). The reason: the web interface then stays reachable at the same address — you find it again instantly and can reliably bookmark it in your browser, instead of hunting for a changing DHCP address.
4.3 Connecting the amplifier
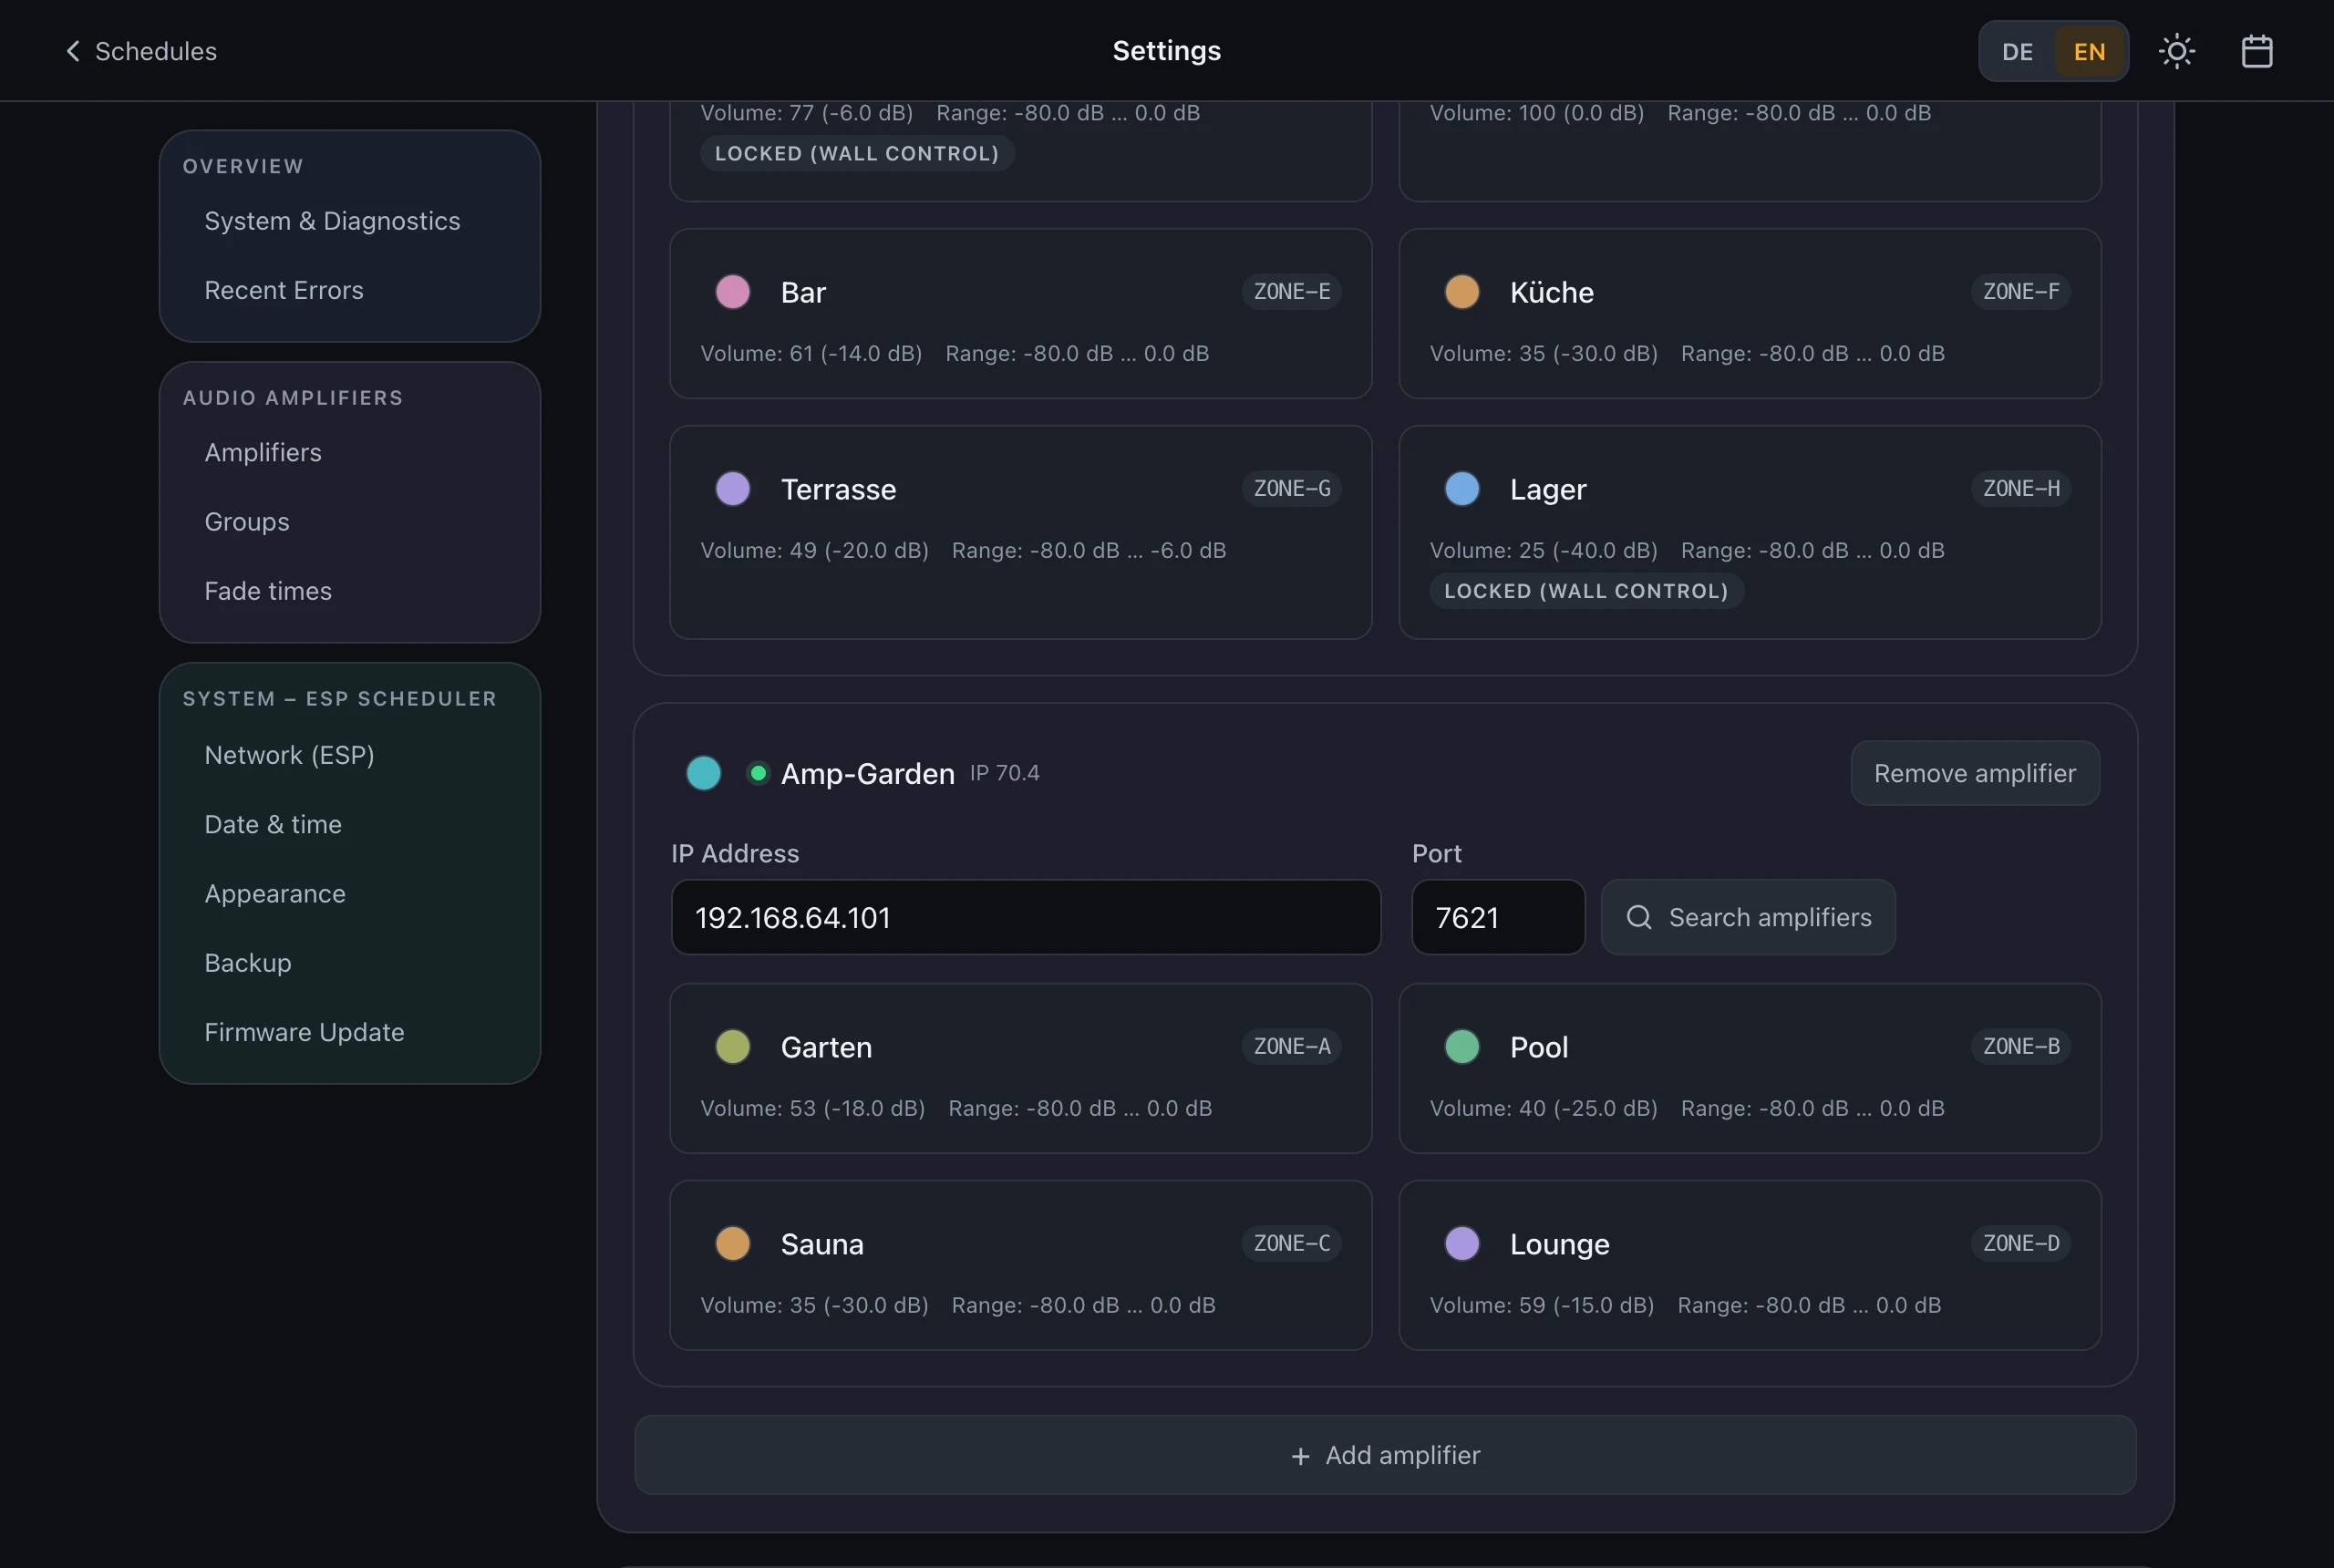
- Gear icon ⚙ top right → Audio Amplifiers section (or use the quick navigation at the top). Each amplifier has its own card there.
- Click “Search amplifiers”. The device scans the network via mDNS; discovered amplifiers appear with model and IP address.
- Click the desired amplifier — IP and port are filled in and saved right away.
- Alternatively, enter IP address and port (default 7621) by hand — it saves when you leave the field or press Enter.
- More amplifiers: click “+ Add amplifier” below the cards, enter the IP address in the new card — leaving the field creates the amplifier. Up to 4 amplifiers are possible.
After saving, the scheduler connects immediately, reads the amplifier’s name, model, zones and inputs, and shows them throughout the interface — no restart required.
4.4 Time
By default the device fetches its time automatically from the internet (NTP), including daylight-saving changes (Central European timezone) — this is the recommended setting. Check the NTP dot in the overview — it must be green. For networks without internet access, the clock can alternatively be set manually (see 8.5).
5. The dashboard
The dashboard is the start page and shows your weekly schedule.
5.1 Header
- Lamp + title: the title is “Schedules”. The lamp on the left is green only while all amplifiers are connected, and red when a connection drops; the tooltip shows “n/m connected”. The header stays put while you scroll, so the lamp is always in view.
- DE/EN: switch the language.
- Sun/moon: light/dark theme.
- ⚙: to the settings and diagnostics page. A yellow dot on the gear means new firmware is available; clicking it then goes straight to Firmware Update (see 10).
5.2 Zone status
Below the group switch, a strip shows what the amplifier is doing right now — one tile per zone, updated live:
- Lamp — green while the zone is passing audio; red when it is muted or switched off.
- Name, followed by a padlock for zones whose volume is fixed at a wall control.
- Level as a dB value and as a bar in the zone’s color, plus the input the zone is currently listening to.
- Top right: how many zones of how many are passing audio (e.g. “5 / 8”).
Zones whose input is set to “Unused Input (Silent)” get a red lamp as well — they cannot pass audio at all, regardless of mute state and level.
Note: this strip is display only. Switching happens exclusively through schedules — so checking the current state can never accidentally interfere with a running system.
5.3 Week view
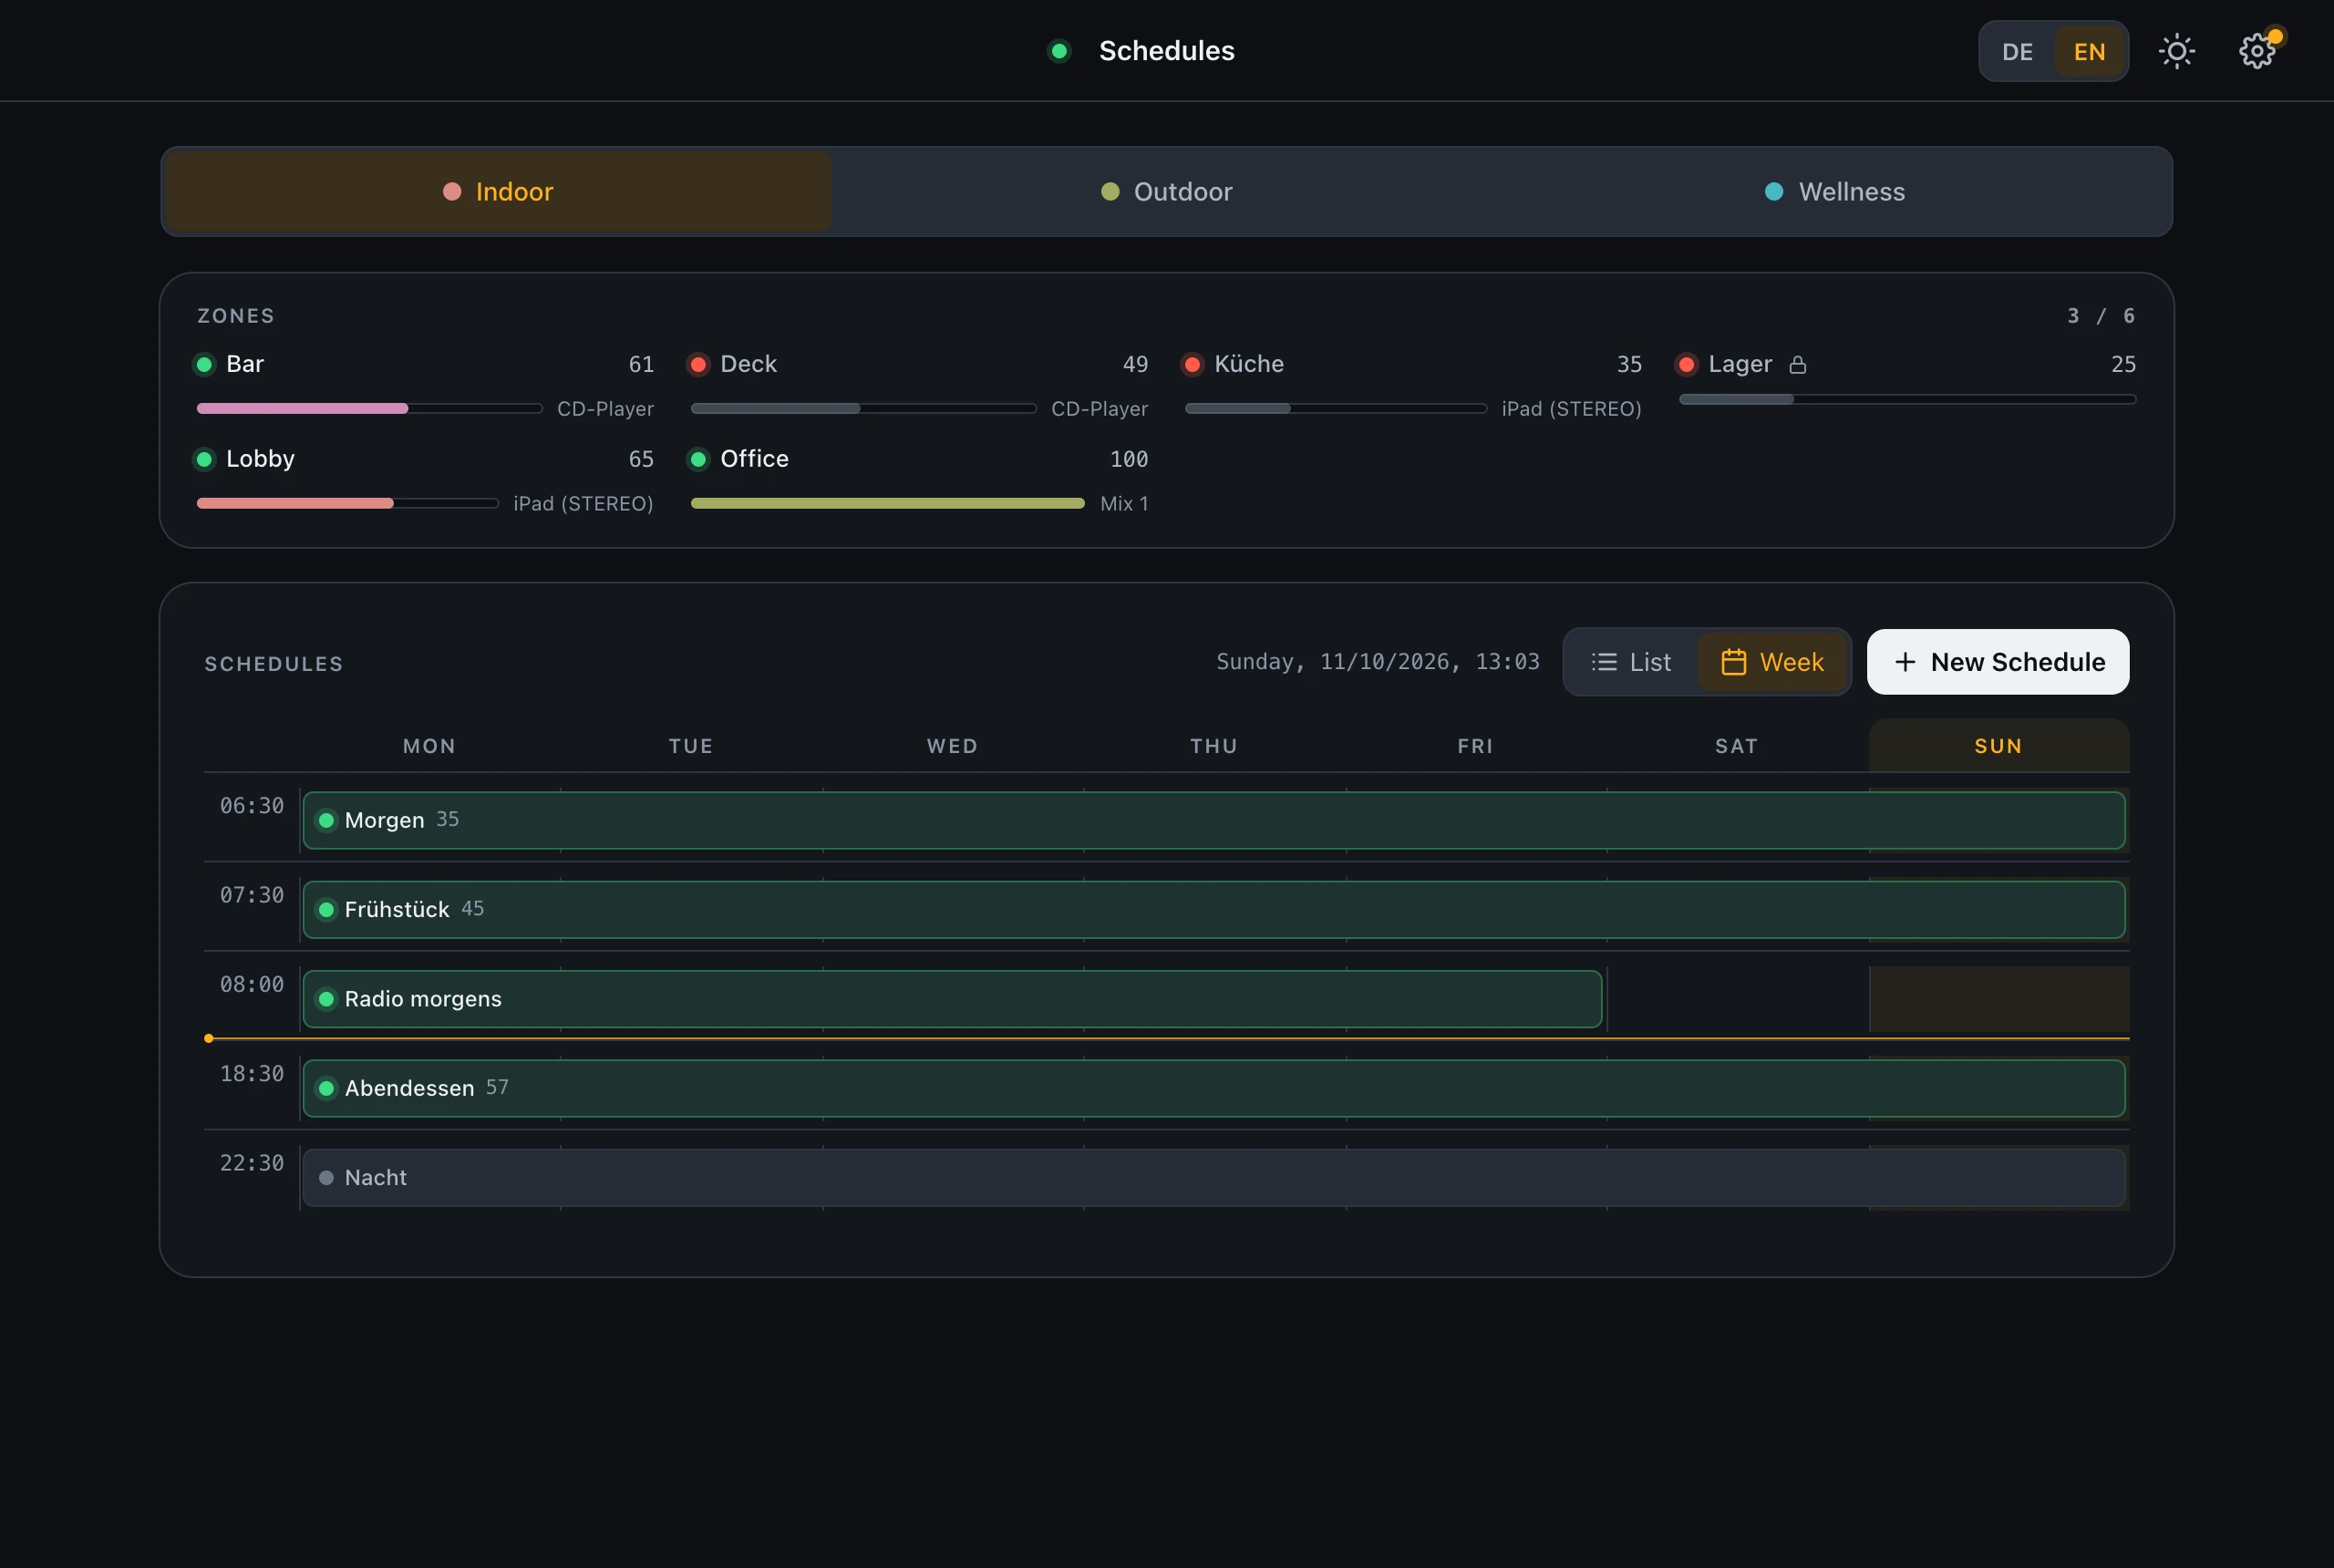
Each row is a trigger time; columns are the weekdays (today highlighted). A bar spanning several days means the event applies on all of them.
- Lamp in the bar — green: the event switches on. Unlit (grey): it switches all of its zones off. Muting is normal operation, so it is deliberately not shown in red like a fault.
- Label — the event’s name. The number on the right is the target volume (0–100); it appears only when every zone that stays on gets the same value.
- Amber line — the current time. Everything above it has already run today.
- Dashed outline with ⚠ = conflict (see 6.4).
- Click a bar to open the event for editing.
5.4 List view
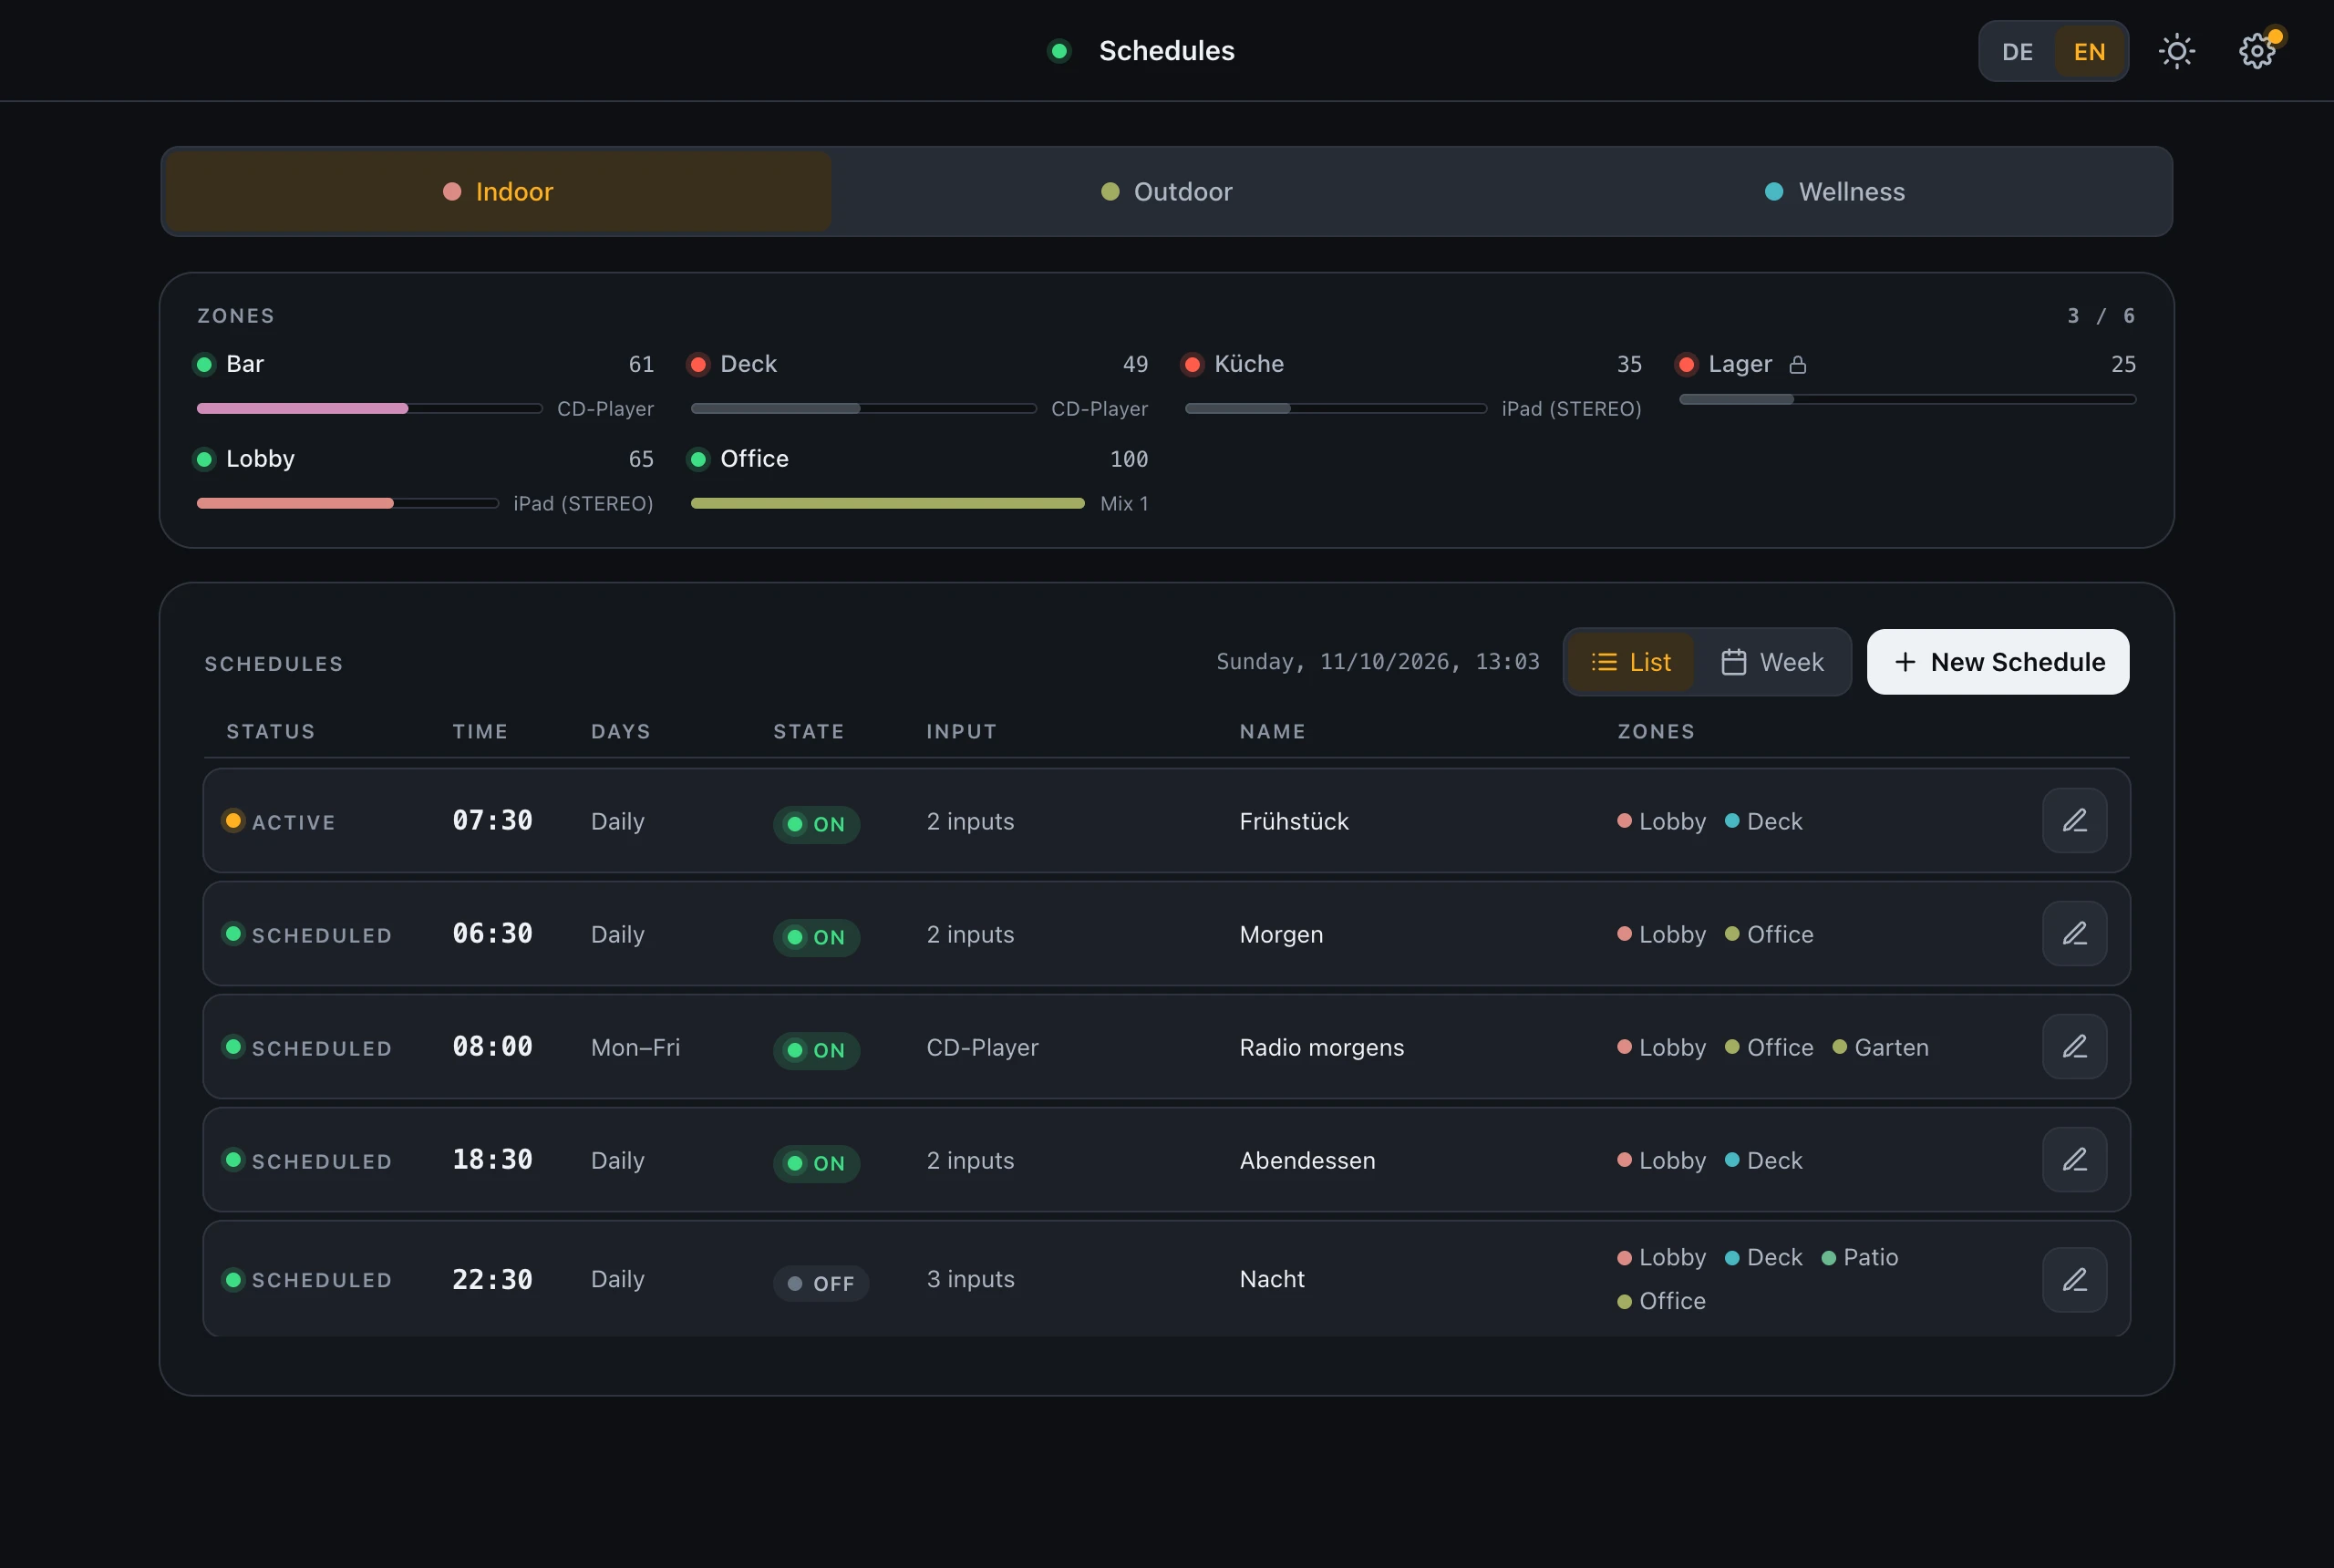
The table shows per event: Status (Active = most recently fired and currently in force / Scheduled / Disabled), Time, Days, State (On/Off), Input (the input name; when the zones switch to different inputs it shows how many — the full list is in the tooltip), Name and the Zones with their color dots. The pencil opens the event.
6. Creating and managing events
6.1 New event
+ at the top right of the schedule area opens the editor:
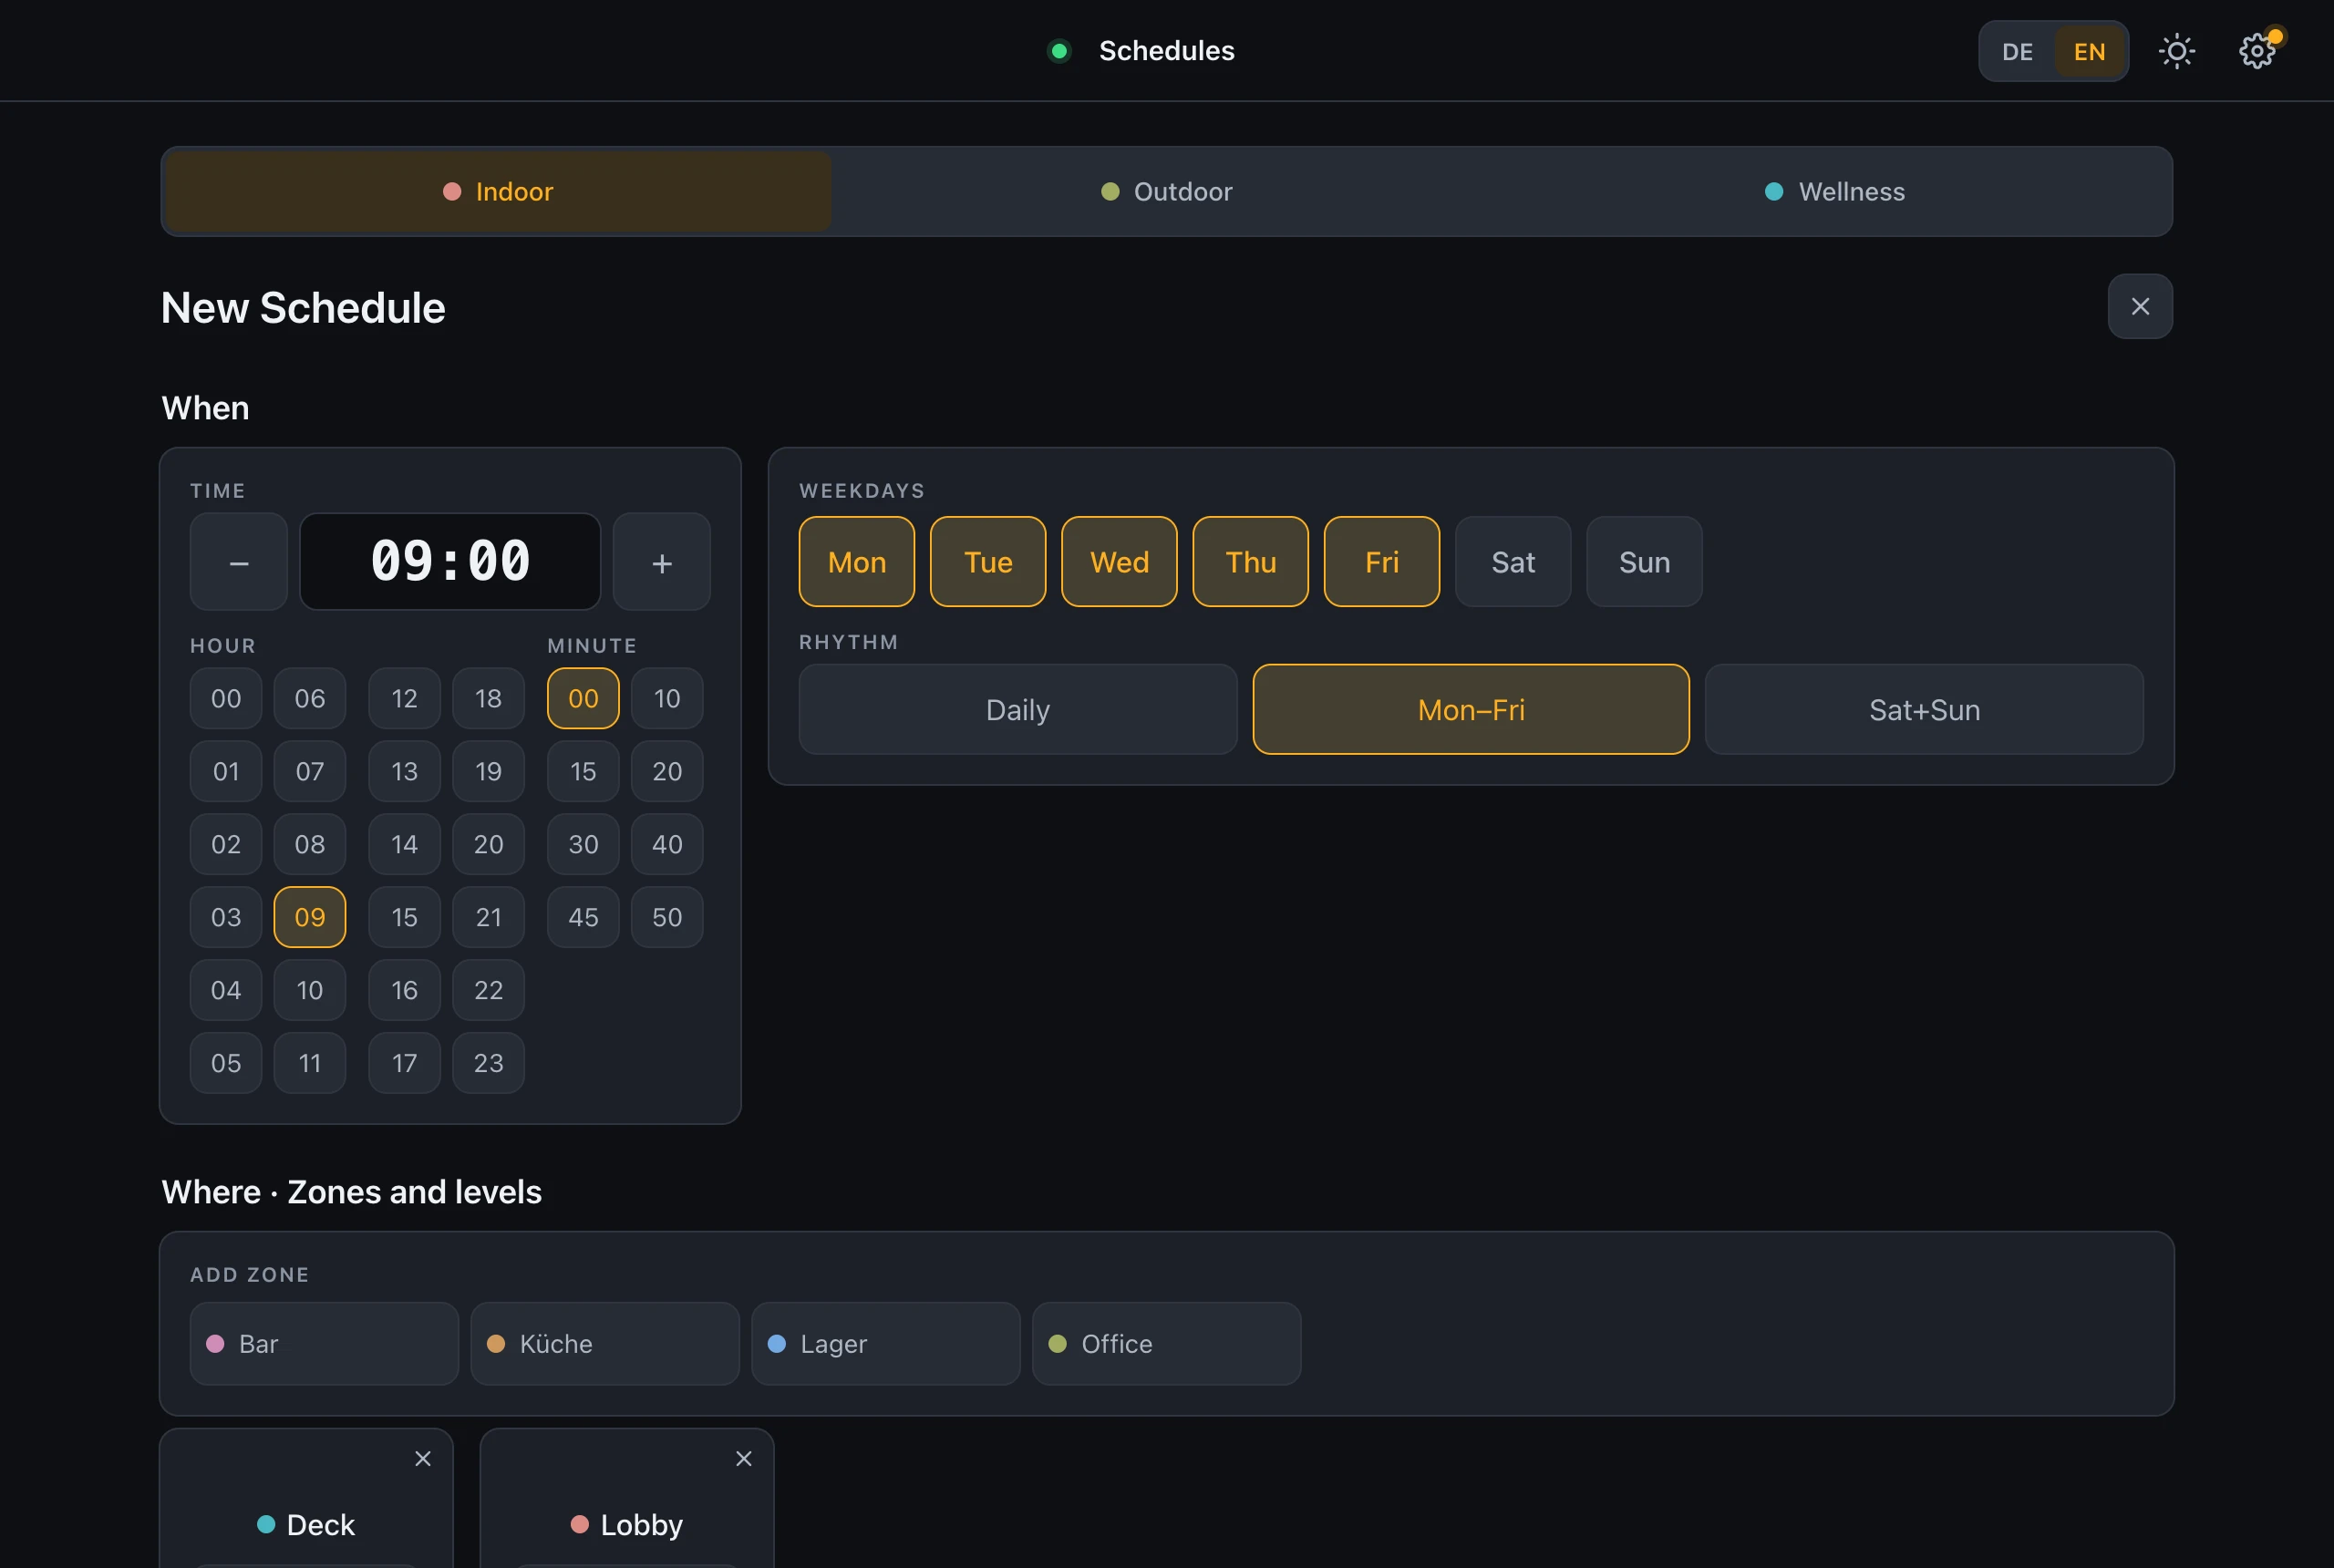
The editor sits below the group switch: the title (“New Schedule”) and the sections When, Where and What stand free; only time, weekdays and zones are cards. An event consists of (all required fields are validated on save, with missing ones named explicitly):
- Time (When) — via −/+, direct input, or the grids: hours column by column (00–11 | 12–23), minutes beside them.
- Weekdays (When) — tap individual days or use the presets Daily, Mon–Fri (preselected for new events), Sat+Sun. On a phone, Mon–Thu sit in one row.
- Zones (Where) — the “Add Zone” band above the selected zones offers the active group’s zones; for zones of another group, switch the group at the top. The most recently added zone comes first. On a phone, two zones sit side by side. Each zone card contains, top to bottom:
- Input (required, preselected with the zone’s current input; only the inputs of the amplifier the zone belongs to are offered),
- volume fader (0–100, same scale as the amplifier’s own app; drag or −/+),
- On/Off switch — this applies to the whole event: one click toggles all cards together.
- Name (What) — required, shown in all views.
When added, each zone initially adopts its current live state (volume and input) as the starting point — you only change what should be different.
6.2 What happens when an event fires
At the configured minute the scheduler first switches each zone’s input, then:
- “Off” event: the volume ramps down over the configured fade-out time, and only then is the zone muted — no audible pop.
- “On” event: the zone is unmuted and the volume ramps to the target over the fade-in time (or the volume fade if the zone was already playing).
Zones whose volume is controlled by a physical wall controller only take on/off and input; the volume part is skipped and noted in the logs.
Note: Events fire exactly at their trigger minute. If the device was powered off at that moment, the event is not executed retroactively — the next regular occurrence applies.
6.3 Editing, duplicating, disabling, deleting
In an open event (header row):
- Disable/Enable — pause an event without deleting it (it appears grayed out at the end of the list).
- Duplicate — copy as a template for similar events.
- Delete — two-step: only a second click on “Really delete?” deletes.
6.4 Conflicts and overlaps
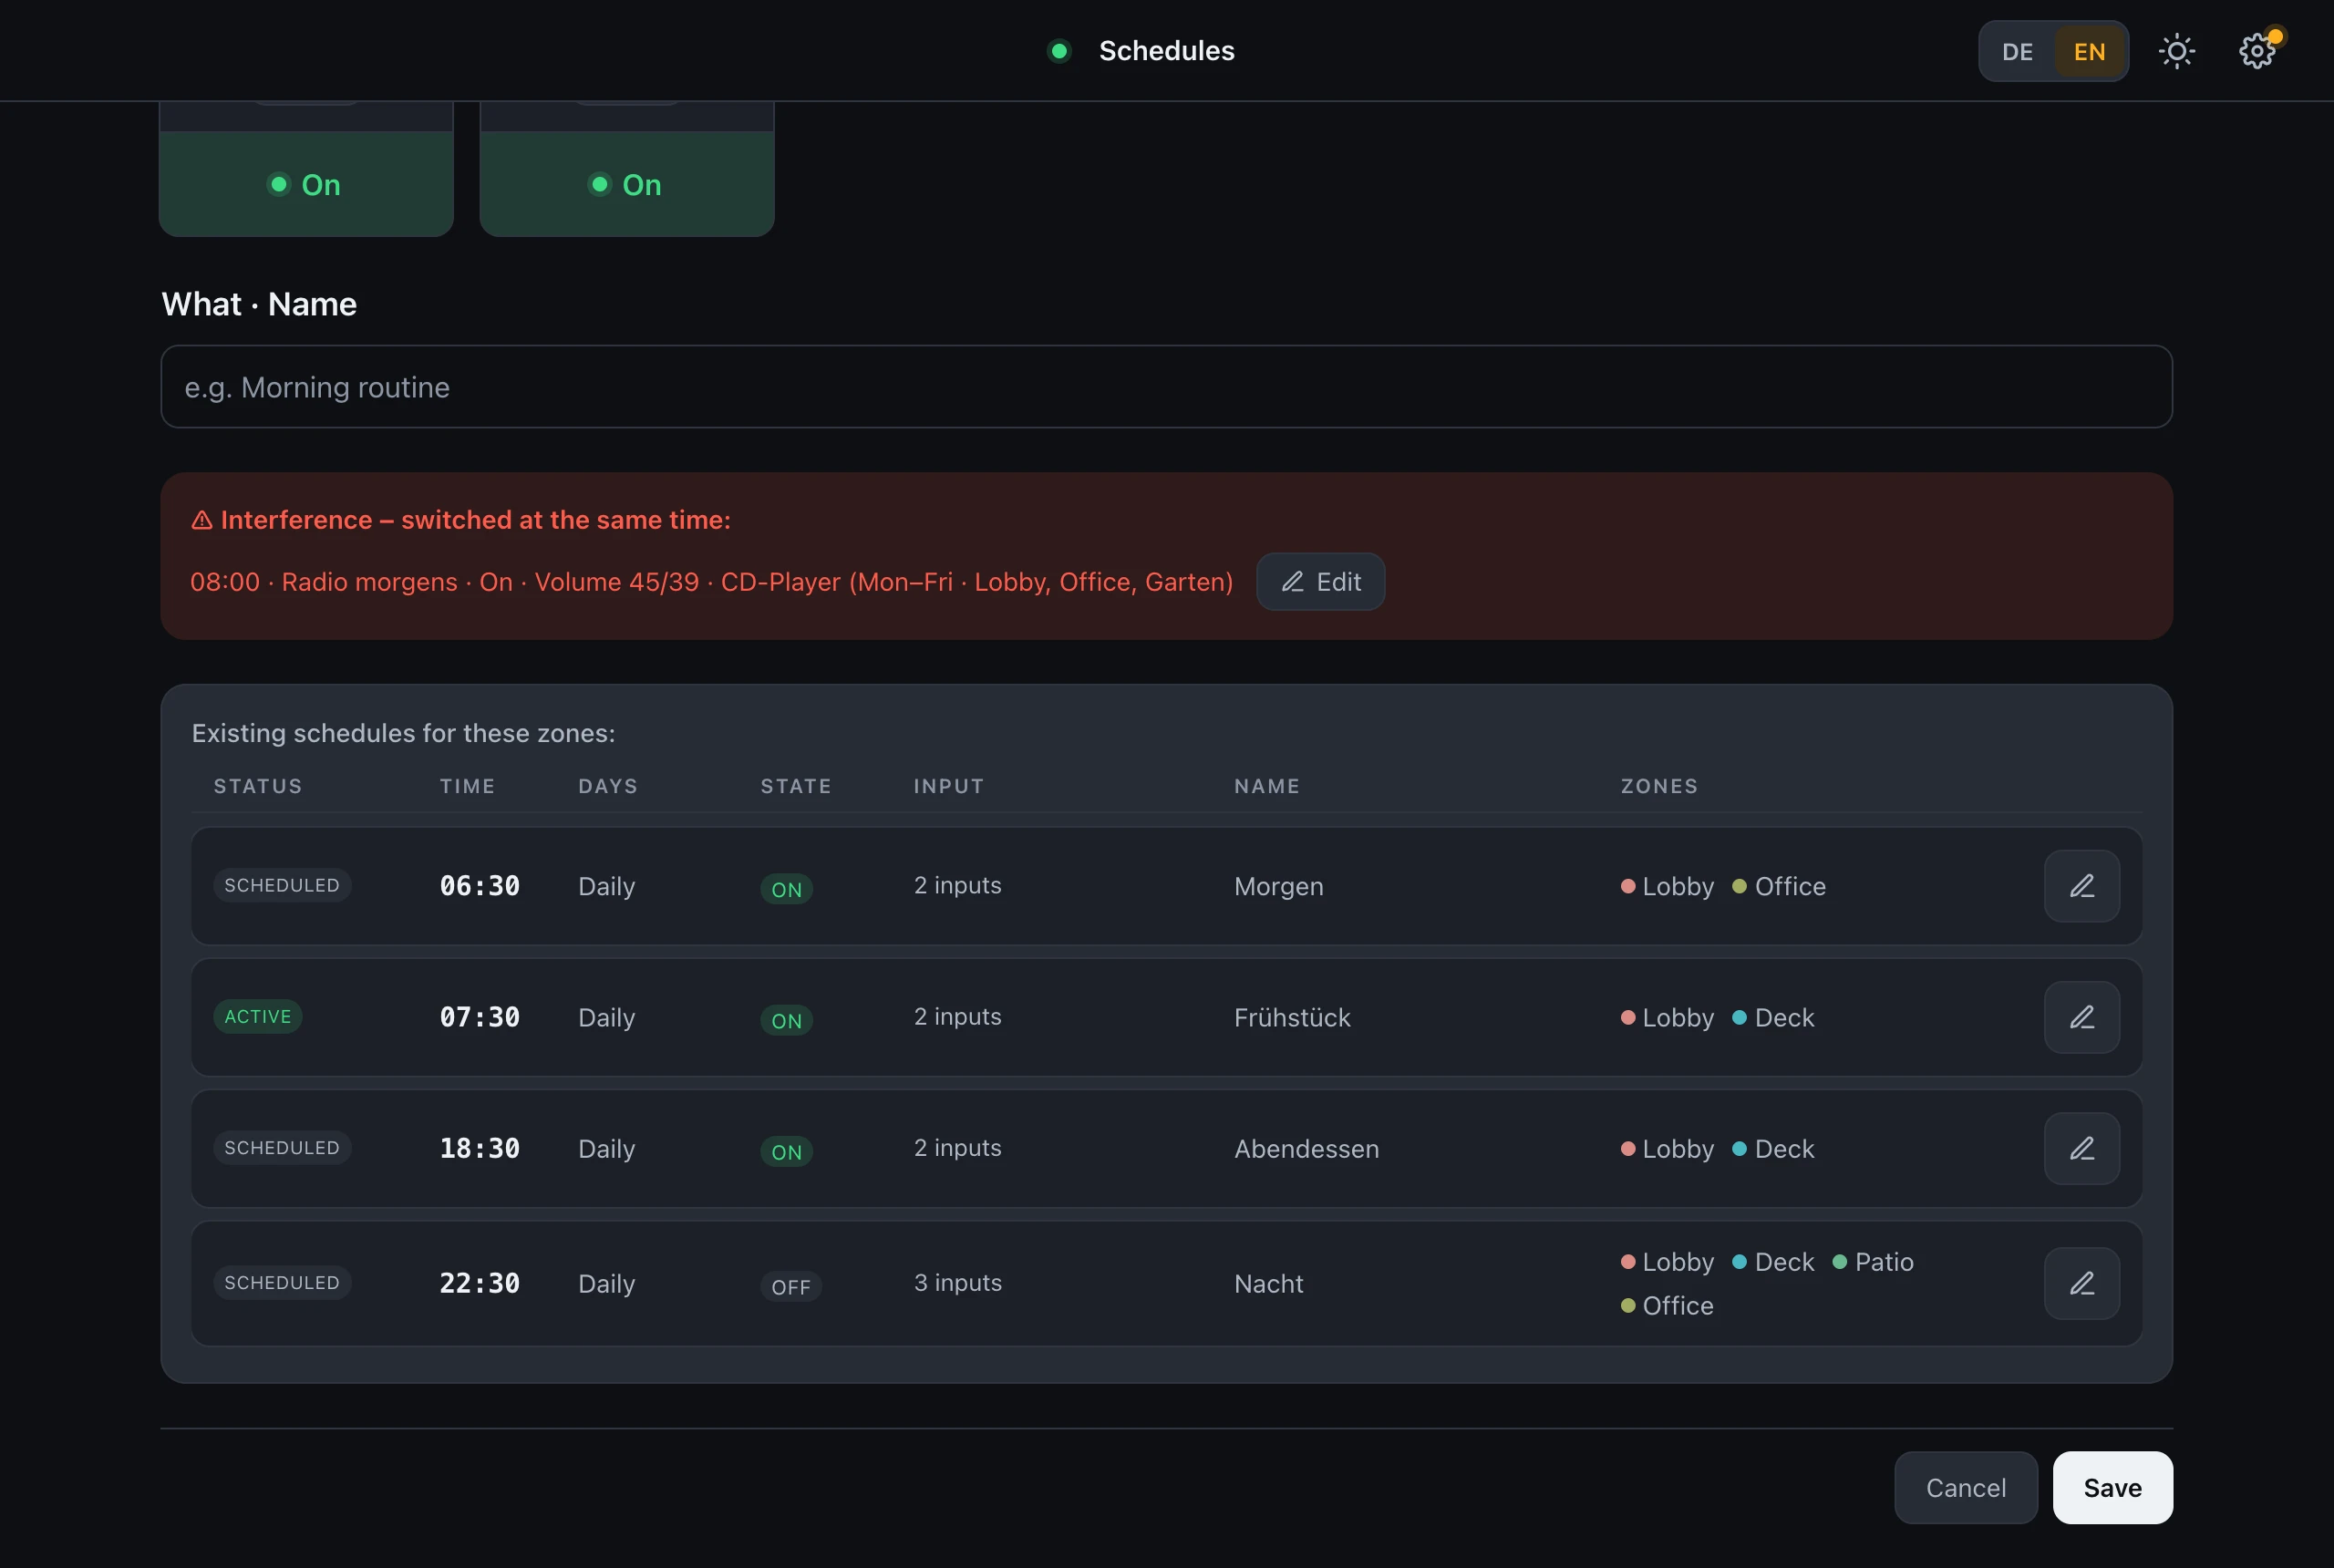
Two enabled events that switch the same zone at the same minute on the same day overwrite each other — which one “wins” is chance. The scheduler makes such cases impossible to miss:
- In list and week view: a red ⚠ Conflict badge / dashed outline.
- In the editor: a red “Interference – switched at the same time” panel naming the conflicting event, with an Edit button that jumps straight to it.
- Additionally informative: “Existing schedules for these zones” — the same table as the dashboard list (status, time, days, state, input, name, zones) with all other events switching the same zones on the same days. You see what daily flow you are stepping into before saving; the pencil jumps straight into that event.
7. Zones and colors
- Zone names come from the amplifier and are maintained there — deliberately not editable in the scheduler.
- Each zone automatically receives a color from a matched 8-color palette; the color dots appear everywhere (table, editor). To change: Audio Amplifiers → the amplifier’s card → click the zone’s color dot → pick a new color.
- With more than one group (see 8.3), a group switch (color dot + group name) sits at the very top of the scheduler page. It switches the whole page to one group: the zones area, list and week view show only that group’s zones and schedules, the editor too shows only its zones, and “Add zone” offers only those. Zones from other groups stay in the schedule and are saved unchanged. A schedule that switches zones from several groups appears in each of them. The group can be switched inside the editor too, to add zones from several groups to one schedule. In the editor, the input picker offers only the inputs of the amplifier the zone belongs to. The volume is shown in the chosen volume unit.
- Zones and groups are sorted alphabetically everywhere.
- Groups only organize the display: an event always switches individual zones, never a group as such.
- With no amplifier connected, the zone areas say exactly that (“No zones detected – no amplifier connected.”); during discovery they show “Searching for zones …”. Both disappear automatically once the connection is up — the interface refreshes itself.
8. Settings reference
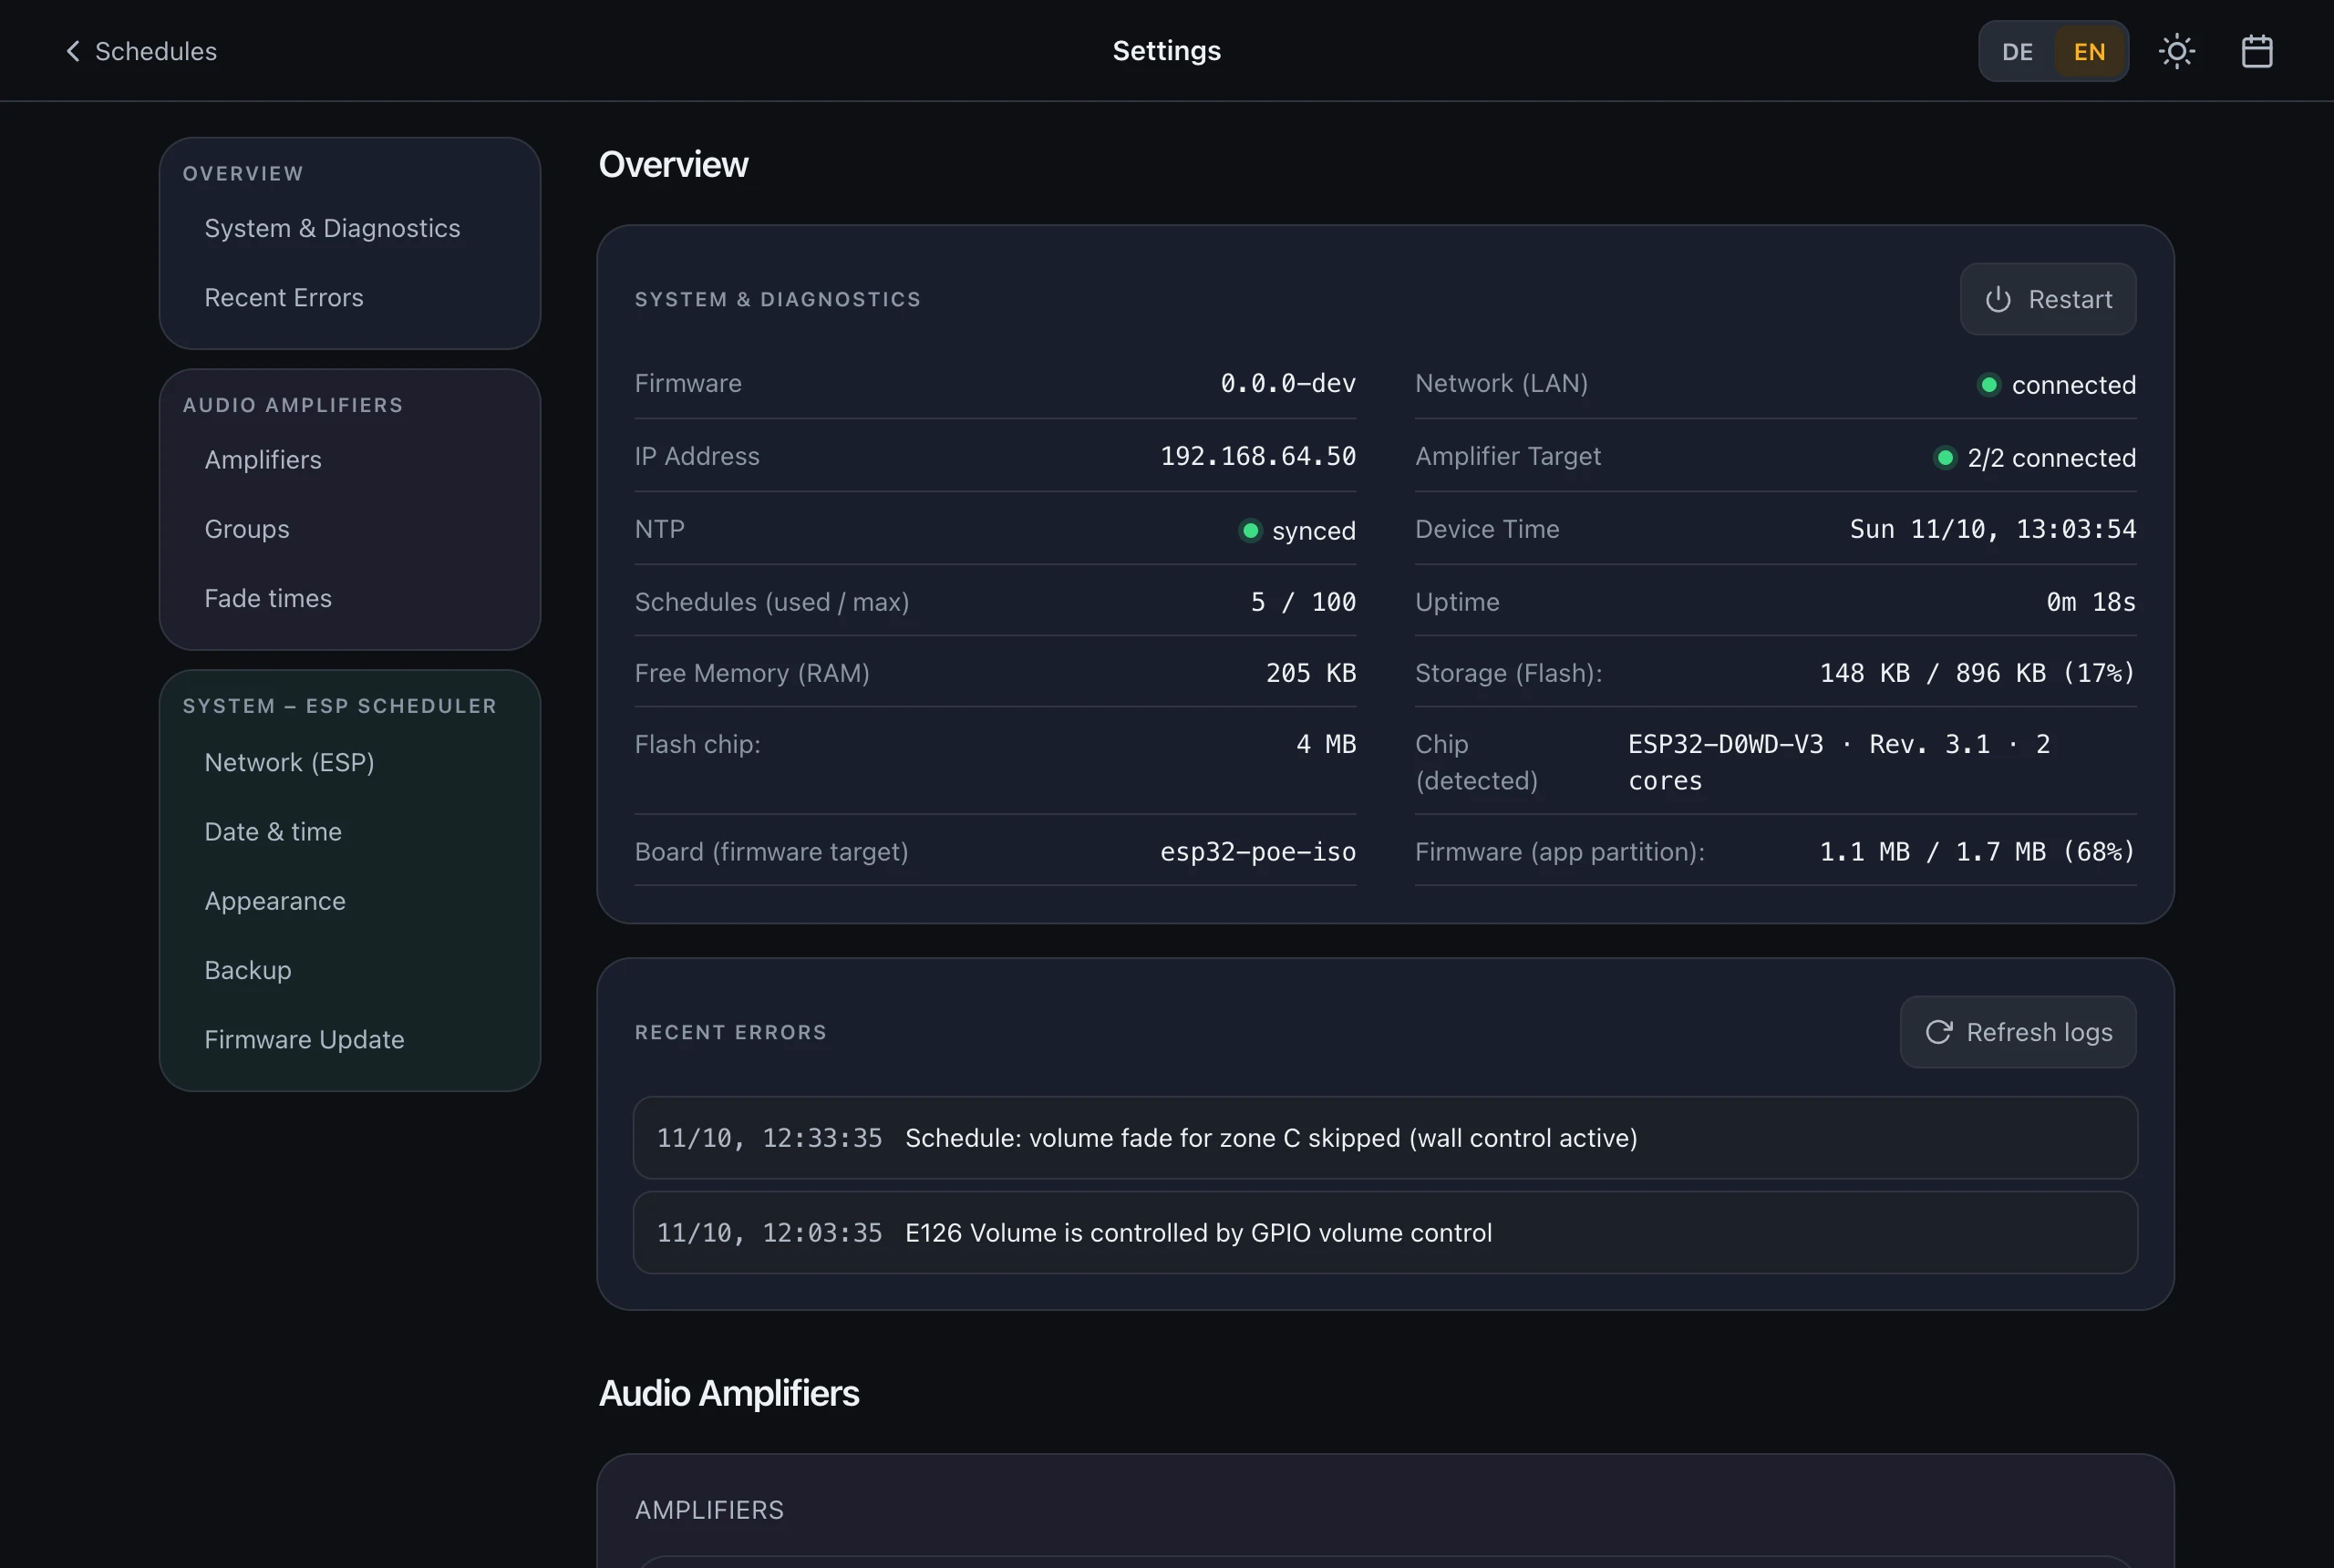
The page behind the gear icon ⚙ is organized into three areas: Overview (read-only, see chapter 9), Audio Amplifiers (amplifier cards, zone groups, fade times) and System – ESP Scheduler (network, date & time, appearance, schedule backup, firmware update). At the very top sits a quick navigation: clicking an entry jumps straight to that section.
8.1 Amplifier cards
Each amplifier has its own card with:
- a color dot (click opens the palette) and a connection lamp,
- name and model as reported by the amplifier,
- IP address / port of the amplifier (default port 7621),
- Search amplifiers — automatic network discovery; clicking a result fills in and saves the fields,
- the zones of this amplifier with their colors, technical identifier (ZONE-A …), the current volume (0–100 and dB) — updated live — plus the permitted control range and, where applicable, “locked (wall control)”,
- Remove amplifier.
Changes to IP address or port are saved when you leave the field (or press Enter) — not on every keystroke. The same amplifier (same address and port) cannot be added twice; the duplicate card is marked red. After saving, the device reconnects immediately — header, zones and inputs refresh automatically.
- Adding: “+ Add amplifier” below the cards opens a new card; once its IP address is entered, the amplifier is created. Maximum 4 amplifiers.
- Removing: “Remove amplifier” needs a second click to confirm. The last amplifier cannot be removed. Removing an amplifier also removes its zones from all schedules.
8.2 Fade times
At the bottom of the Audio Amplifiers section, shared by all amplifiers — three separate ramps in seconds:
- Fade-in (switching on, default 3 s)
- Fade-out (switching off, default 5 s)
- Fade on volume change (default 3 s)
Applies to manual and scheduled switching alike. Changes are saved right away when you leave the field.
8.3 Zone groups
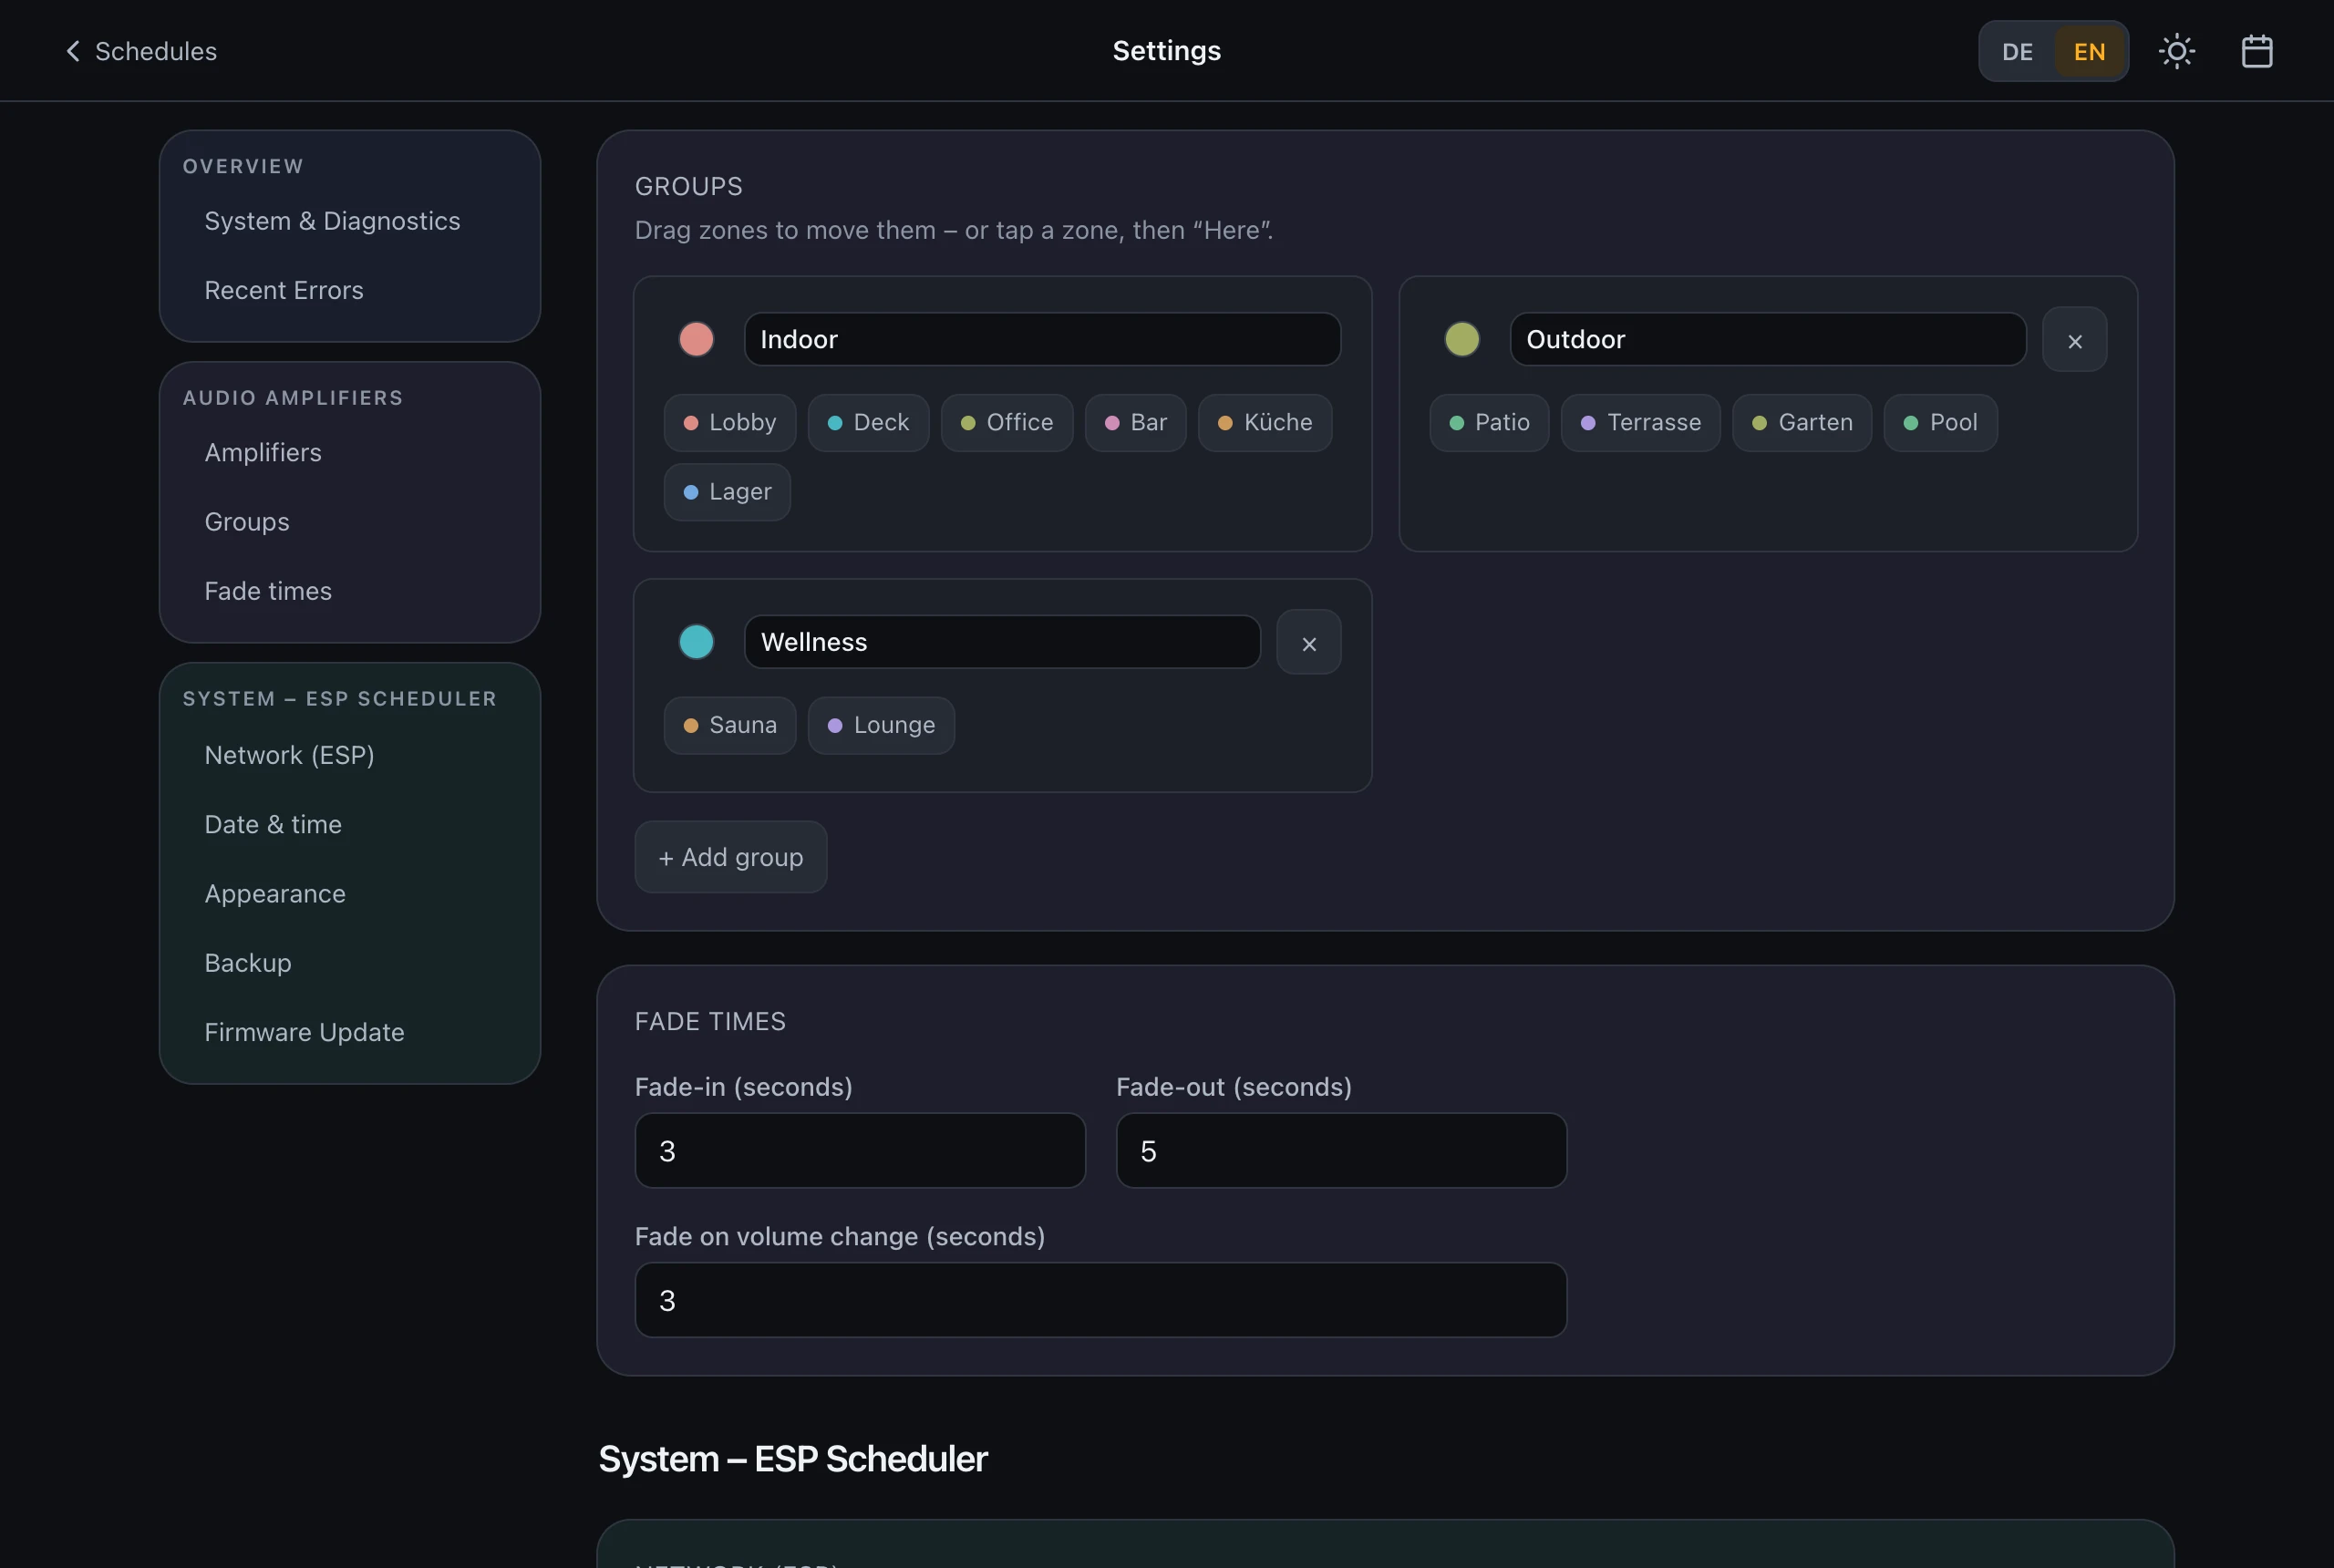
The zones of all amplifiers are organized in groups, shown as chips (color dot + name only):
- The first group is called “Default Group”. Each further amplifier brings a group “Default Group - ‹amplifier name›” (the host until the name is reported).
- Moving zones: drag a chip onto another group with drag & drop — or tap a chip and then “Here” on the target group (handy on a phone).
- Groups can be renamed and recolored; “Add group” creates new groups (maximum 12).
- Deleting a group moves its zones to the first group. The first group itself cannot be deleted.
- Changes are saved immediately.
8.4 Network (ESP)
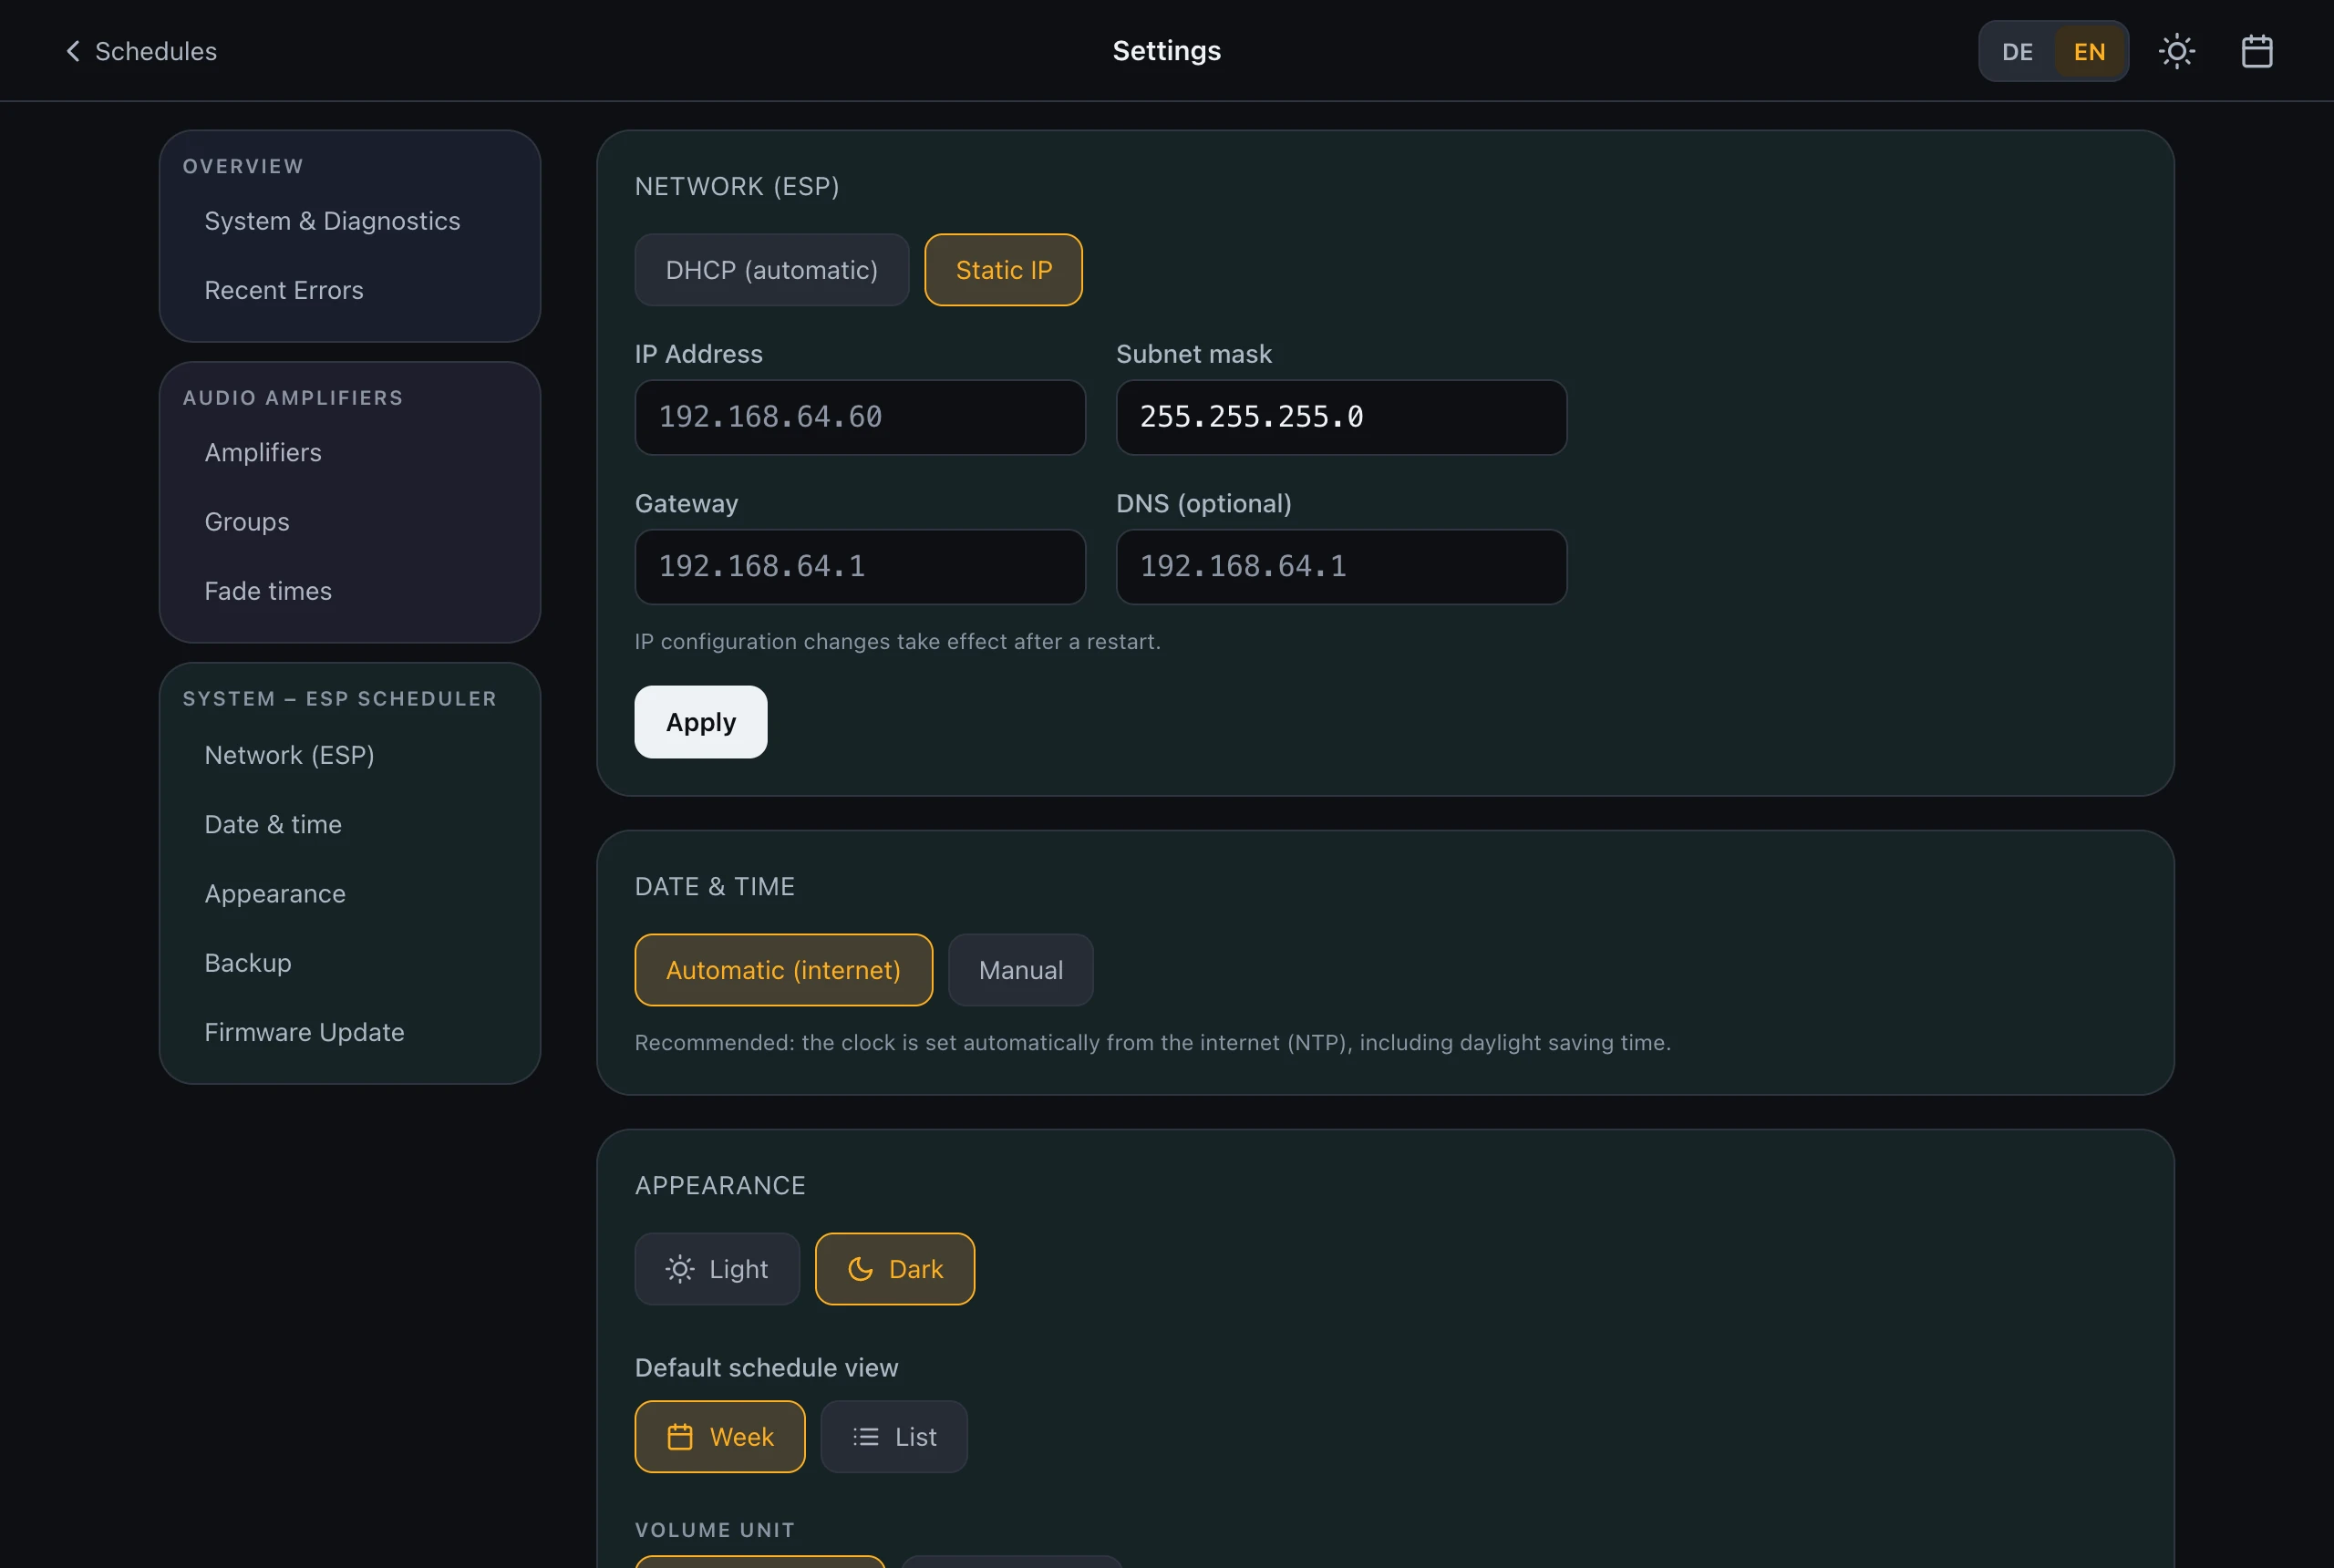
- DHCP (automatic) — the default. If the DHCP server is missing, the fallback address 192.168.64.123 kicks in after 20 s.
- Static IP — fixed address with subnet mask, gateway and optional DNS. Inputs are validated; a configuration that would make the device unreachable is rejected (“Invalid settings – not saved”).
- Important: IP changes only apply after a restart. Unlike the rest of the page, the network settings are only saved with “Apply”. Afterwards a red notice with a direct restart button appears.
8.5 Date & time
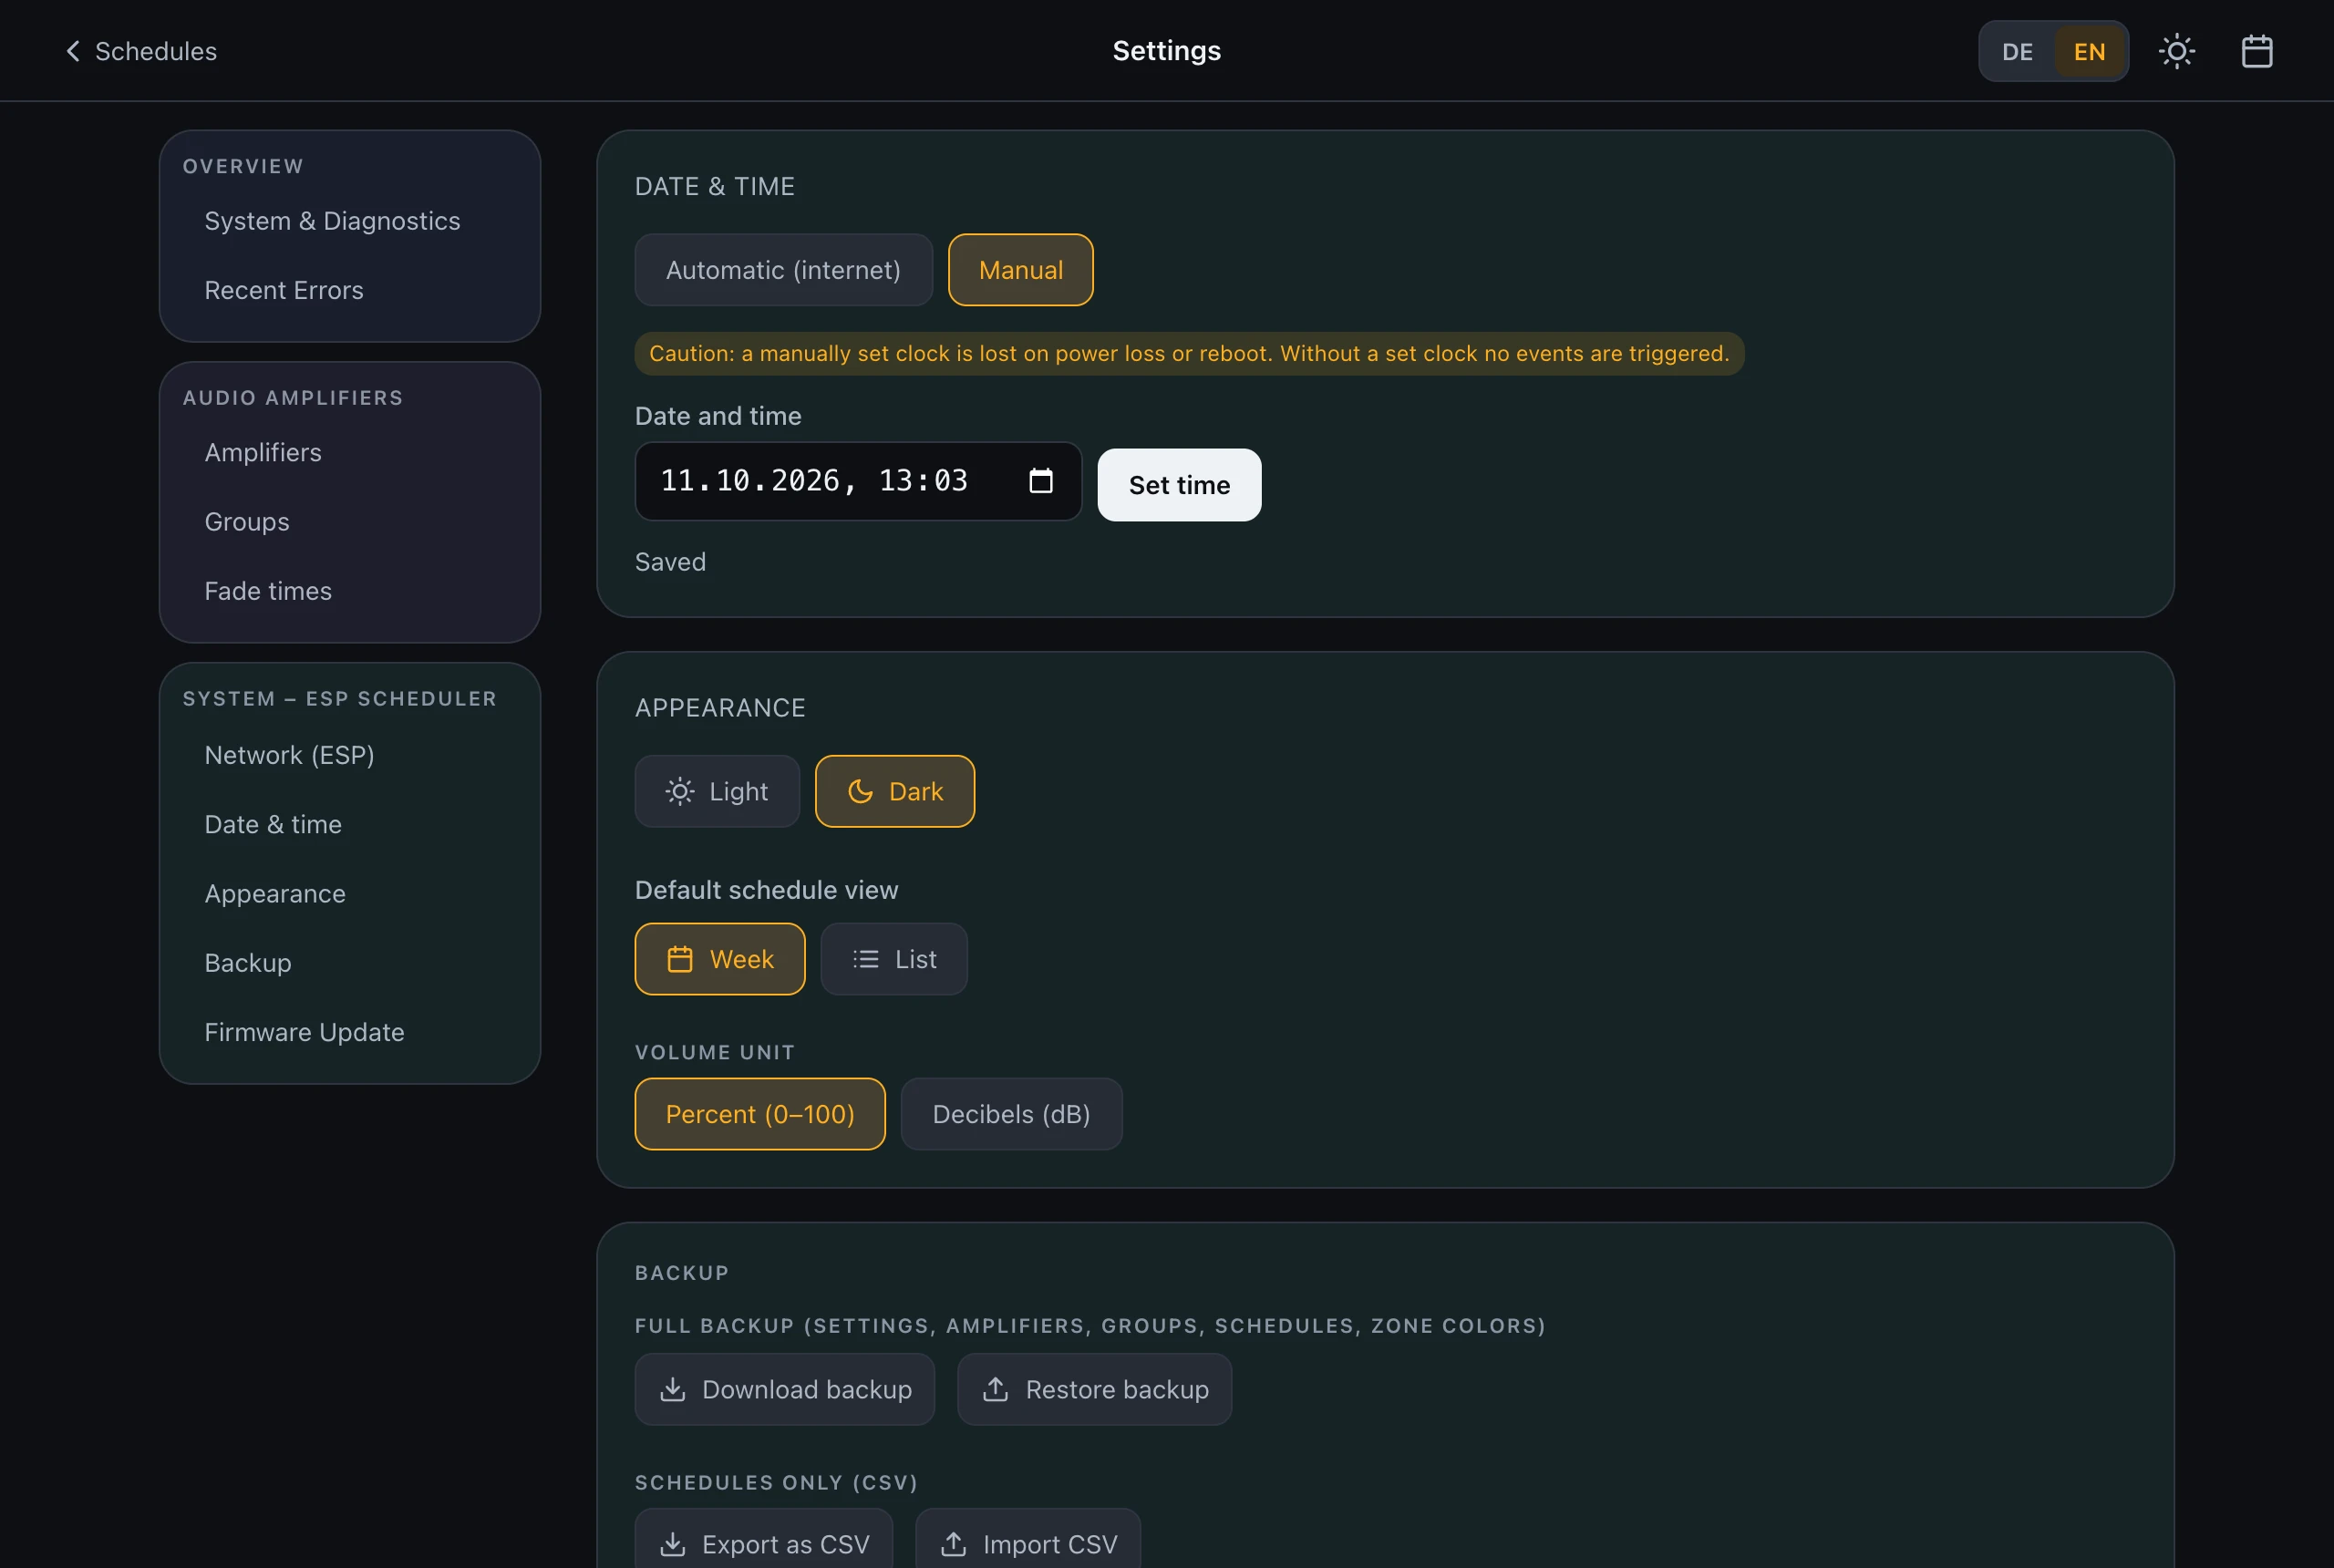
- Automatic (internet) — the default and recommended: the clock comes from the internet via NTP, including daylight-saving changes. No maintenance needed.
- Manual — for networks without internet access: pick the mode, enter date and time (prefilled with your device’s time) and click “Set time”. From that moment the scheduler runs on the entered clock.
Caution with manual time: The device has no backup battery — after a power outage or restart the manual clock is lost. The scheduler then deliberately pauses (the overview shows “Time (manual): not set”) until the time is set again. Automatic daylight-saving changes also do not happen in manual mode. Wherever possible, stay on Automatic.
8.6 Appearance
- Light/Dark — interface theme.
- Default schedule view — whether the dashboard starts with the week or list view (week is the default). Both are per-browser preferences.
8.7 Schedule backup
See chapter 11.
8.8 Firmware update
See chapter 10.
9. Checking device health
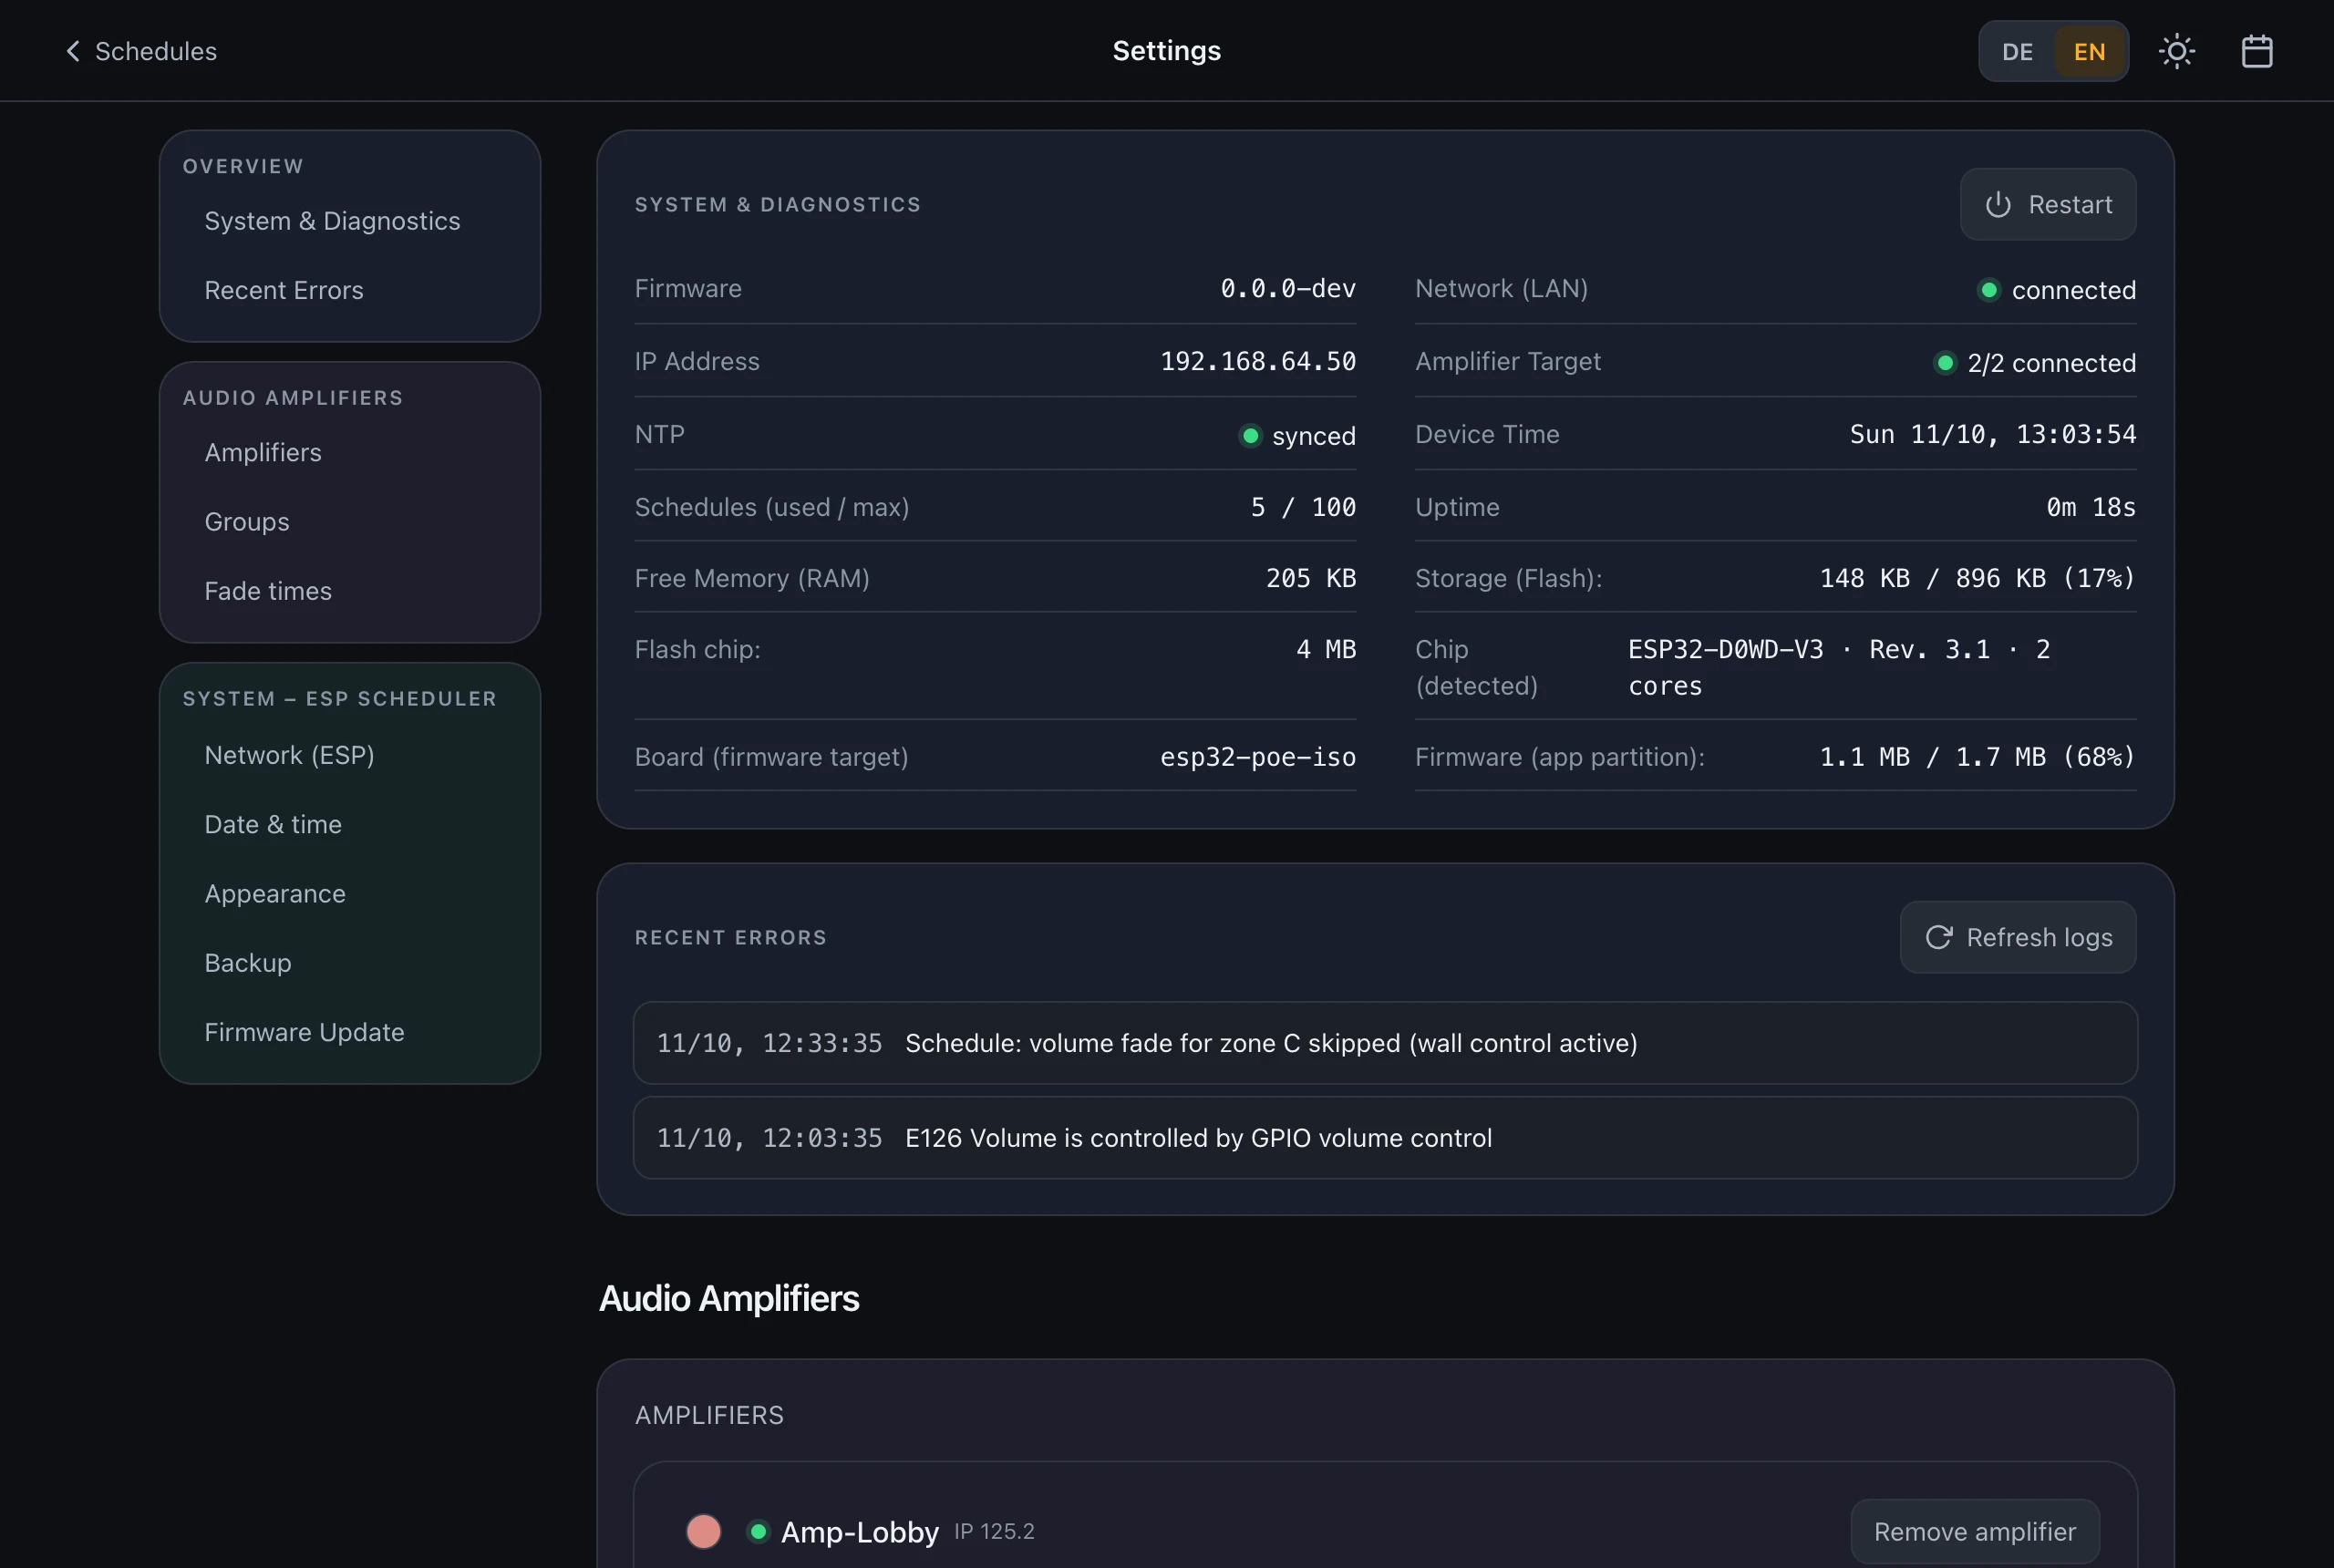
The Overview → System & Diagnostics section shows at a glance whether everything is healthy. The indicator dots:
| Field | Meaning | Target |
|---|---|---|
| Firmware | Installed software version | current version |
| Network (LAN) | The scheduler’s Ethernet link | 🟢 connected |
| IP Address | The scheduler’s address on the network | reachable |
| Amplifier Target | Connection to the amplifier (IP:port) | 🟢 connected |
| NTP / Time (manual) | A valid clock — prerequisite for all switching. With automatic time: “synced”; with manual time: “set” | 🟢 synced / set |
| Device Time | The device’s current time | correct, incl. date |
| Schedules (used / max) | Stored events vs. capacity (e.g. “12 / 100”; above 999 shown as “999+”) | below the maximum |
| Uptime | Time since the last restart | — |
| Free Memory (RAM) | Free working memory | > 50 KB |
| Storage (Flash) | Space used for schedules/interface | < 80 % |
| Flash chip | Size of the fitted flash memory (4/8/16 MB) | — |
| Chip (detected) | The ESP32 actually fitted, with revision and core count | — |
| Board (firmware target) | The board the running firmware was built for. A red notice appears if it differs from the detected chip | matches the device |
| Firmware (app partition) | How much of the app partition the running firmware uses | < 90 % |
All values refresh themselves every few seconds. Below, Logs lists the latest messages and errors (e.g. skipped fades on wall-controlled zones, update events) with timestamps; “Refresh logs” reloads the list. Restart (top right, two-step protected) reboots the device — schedules and settings are of course preserved.
10. Software updates and rollback
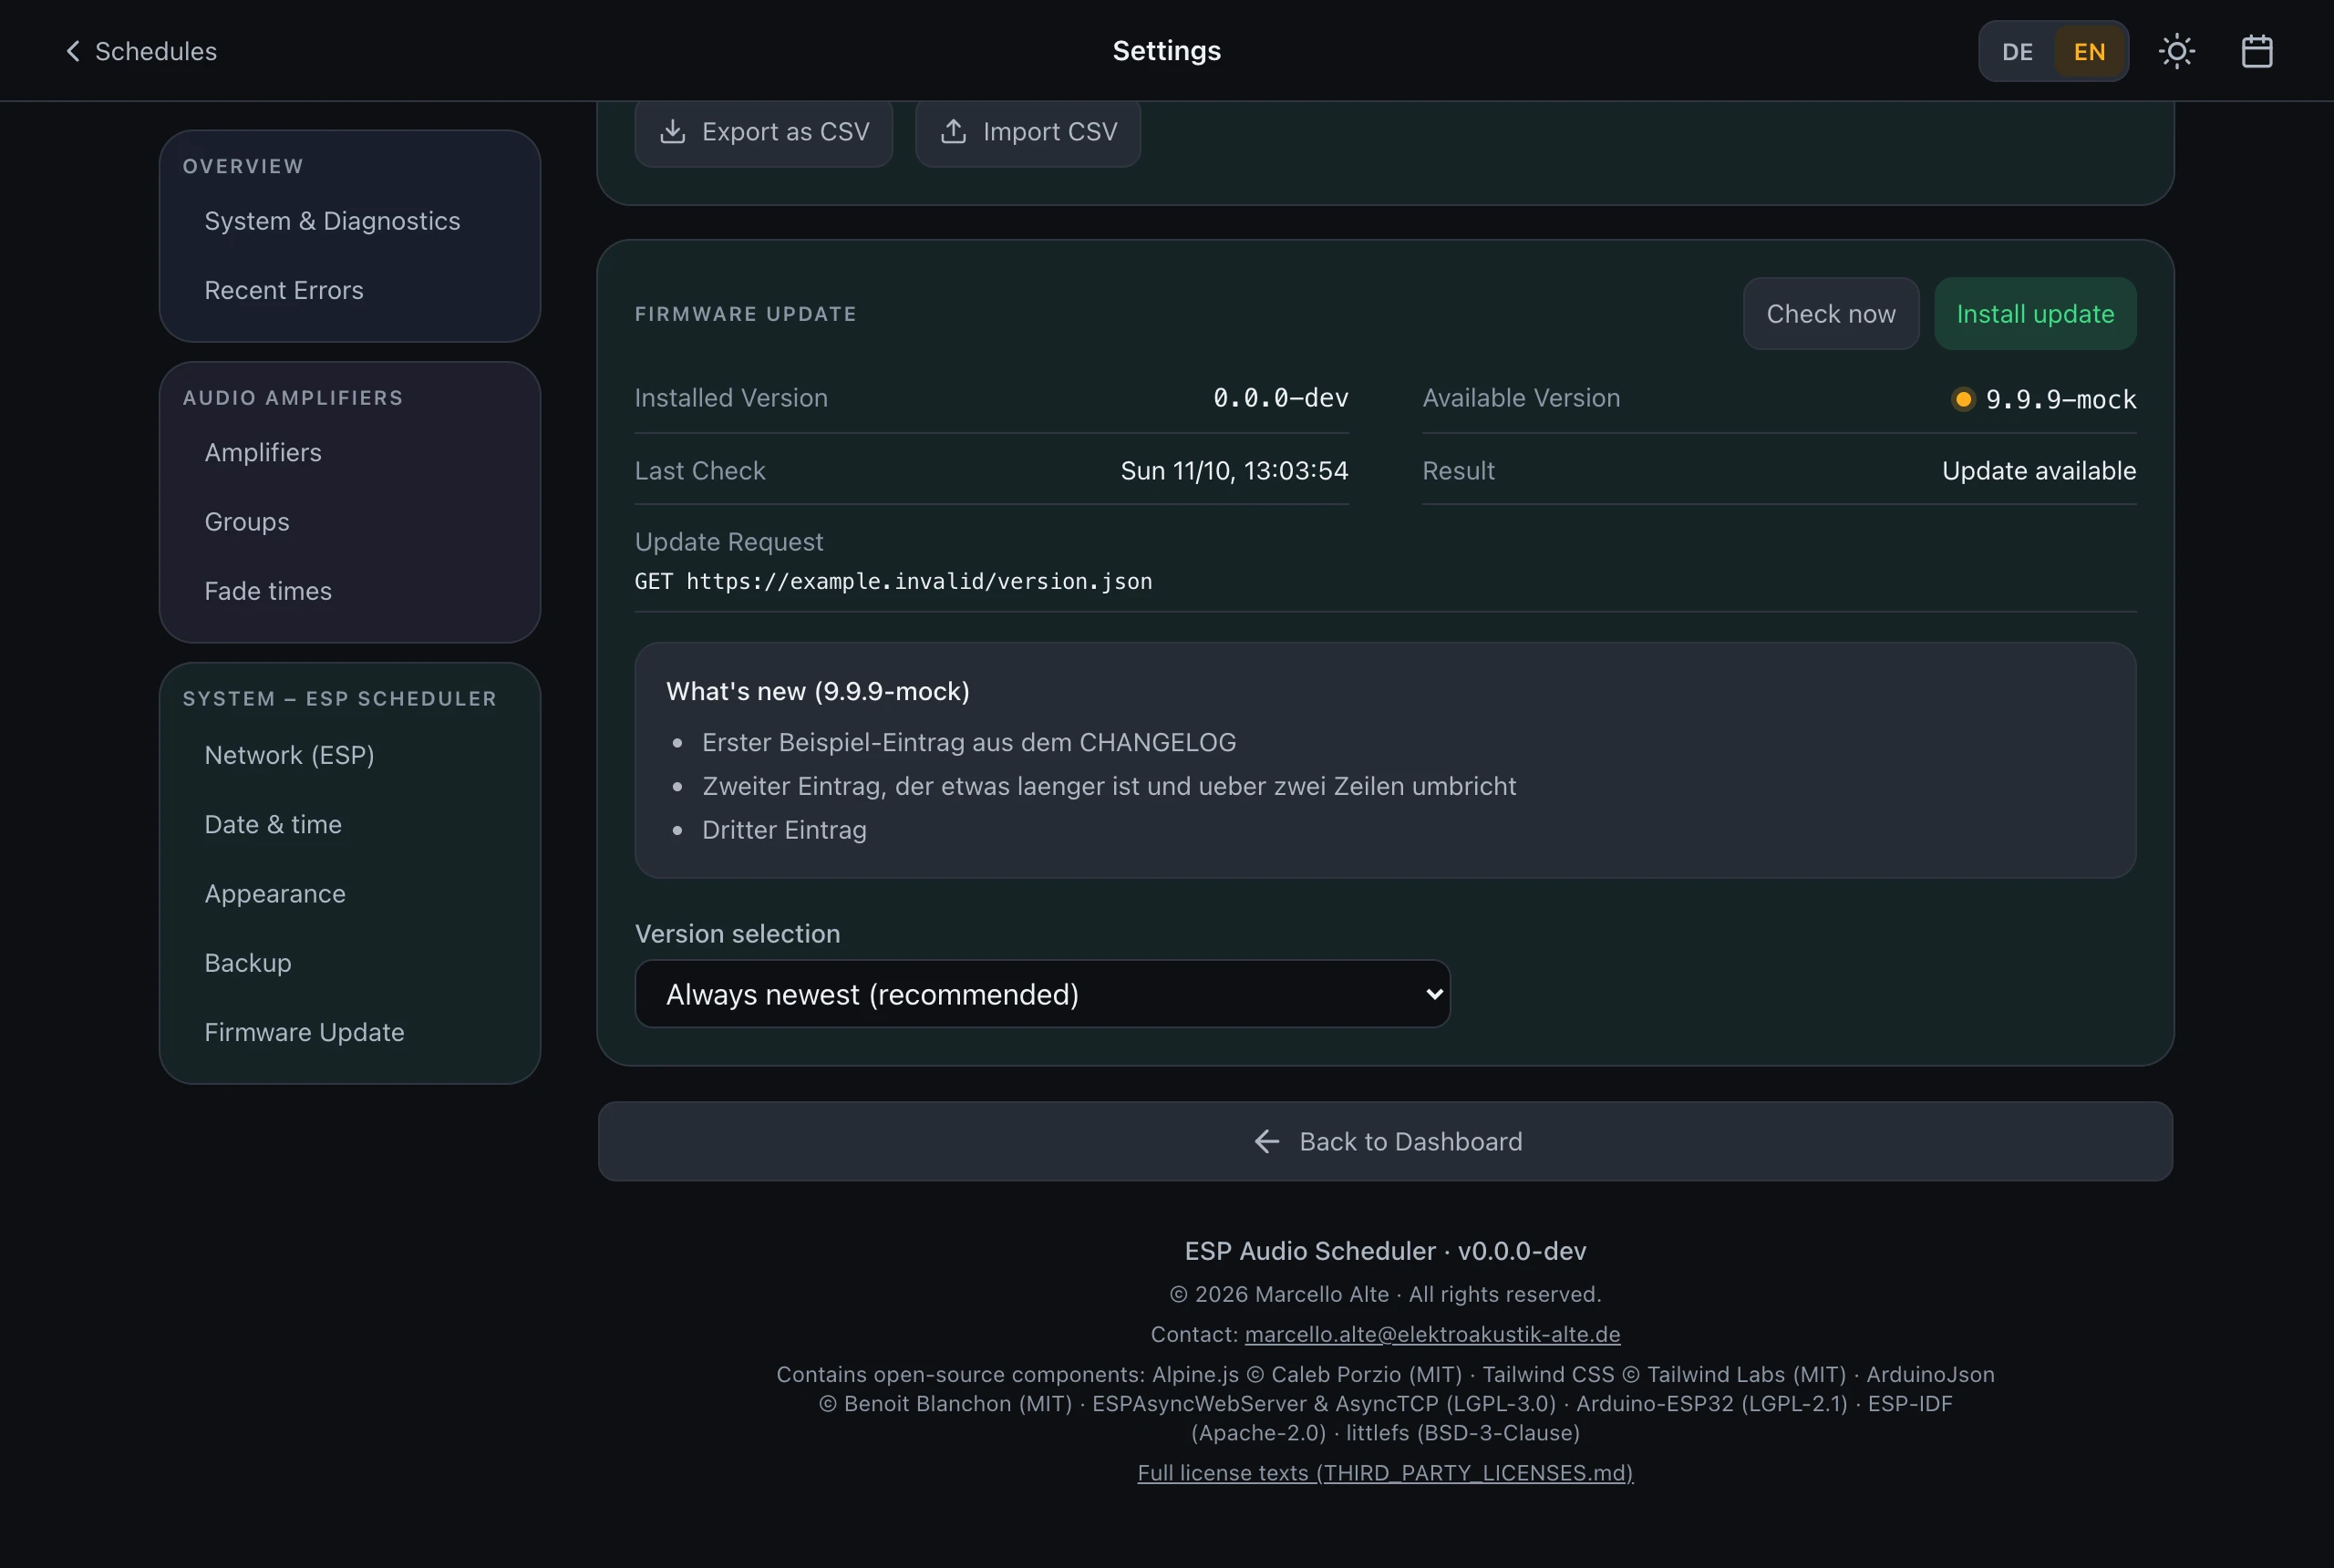
A running system is never changed on its own — you always install updates deliberately:
- Notify: every 6 hours the device checks for a new version and does not install it. When one is available, the gear at the top right of the schedules page shows a yellow dot; clicking it goes straight to Firmware Update.
- Install: System – ESP Scheduler → Firmware Update → “Install update” (or “Check now” first). Firmware and web interface are updated together; your data (schedules, settings, colors) is preserved. During installation the device reboots once (< 1 minute).
- Version selection: the default is “Always newest (recommended)”. The dropdown can pin a specific version — including an older one (“one back”). The choice is saved and checked immediately; installing still only happens via the button.
Updating to 0.3.1
Devices on 0.3.0 or older still install 0.3.1 automatically one last time — that is how their firmware was built. From then on, updates only happen at the push of a button. Coming from 0.2.x or older, existing settings, schedules and zone colors are taken over automatically and assigned to amplifier 1; further amplifiers can then be added (see 8.1).
Going back to an older firmware is possible. Schedules changed after the update should then be restored from a backup (see 11).
Built-in protection (rollback)
If a freshly installed firmware fails to boot cleanly three times in a row, the device automatically switches back to the previous version and flags the faulty version (shown as a red “Blocked after failed boot” notice). Deliberately installing it again clears the flag.
Note: In the first ~90 seconds after an update, avoid power-cycling the device repeatedly — that is counted as a failed-boot series and triggers the rollback. If it happens, simply reinstall the update.
11. Backup (CSV)
System – ESP Scheduler → Schedule backup:
- “Export as CSV” downloads
zeitplaene.csv— your complete weekly schedule as a table, also readable and editable in Excel/Numbers/LibreOffice. - “Import CSV” reads such a file and replaces the entire schedule. For safety this is a two-step action: after picking the file, “Replaces all existing schedules – click again” appears; only that second click performs the import.
File format (one row per event zone; the entry column groups the rows of one event):
| Column | Content | Example |
|---|---|---|
| entry | Event group number | 1 |
| name | Name | Breakfast |
| enabled | 1 = enabled, 0 = disabled | 1 |
| time | Time HH:MM | 07:30 |
| days | Weekdays 0=Sun … 6=Sat, separated by | |
1|2|3|4|5 |
| zone | Zone A–H | A |
| muted | 1 = off, 0 = on | 0 |
| gainDb | Target volume in dB (exact) | -22 |
| sourceId | Amplifier input number | 100 |
Full backup: the backup (format v2) additionally contains the amplifiers and groups. Older v1 backups and old CSV exports can still be imported — they are assigned to amplifier 1 (a v1 backup resets the groups).
Recommendation: Export once after setup and store the file safely — with it, your schedule is restored on a replacement device within a minute.
12. Troubleshooting
12.1 Check first: the two indicator dots
Almost every fault can be traced to the two status dots in the Overview — which is exactly why step 4 of the quick start asks you to check them:
- Amplifier Target 🟢 — The scheduler has a live control connection to the amplifier. Only then can it send commands at all: switching zones, changing volume, selecting inputs, reading zone names and live values. If the dot is red, events formally run but never reach the amplifier — and the zone areas of the interface stay empty. What to do: Amplifier powered on? Both devices on the same network? Then Audio Amplifiers → “Search amplifiers”, click the result, save (default port 7621).
- NTP / Time 🟢 — The device has a valid clock. Without one, the scheduler fires no events whatsoever (protection against switching at wrong times — see the big warning in 4.4). If the dot is red, simply nothing happens, even if the schedule looks correct. What to do: With “Automatic”: check the network’s internet access (NTP needs outbound port 123) and wait a few minutes. Without internet: switch to Manual and set the time (System – ESP Scheduler → Date & time, see 8.5) — required again after every restart.
If both dots are green and something still misbehaves, use the table:
| Problem | Likely cause | Solution |
|---|---|---|
| Web interface unreachable | Name not resolving / different IP | In order: esp-audio-scheduler.local, the IP from the router’s device list, fallback address 192.168.64.123 (only without a DHCP server). Check cable/link LED. |
| Reachable, but “Amplifier: disconnected” (red dot) | Wrong IP/port, amplifier off, different subnet | Audio Amplifiers → “Search amplifiers”. No result: amplifier powered? Same network? Port 7621 correct? |
| Zone areas empty | No amplifier connected | The message names the cause. Establish the connection — zones appear automatically, no reload needed. |
| Event did not fire | Clock invalid · event disabled · wrong days · device was powered off | Check the time dot in the overview (see 12.1). Check the status in the list (Disabled?). Missed occurrences are not executed retroactively. |
| No switching after a restart (manual time) | A manual clock is lost on power loss/restart | System – ESP Scheduler → Date & time → set the time again — or switch permanently to Automatic (internet). |
| Scheduled switch-on but no sound | Wall-controlled zone · input “Unused/Silent” · source has no signal | Check the logs (“gain fade skipped (wall control)”). Verify the event’s input. Check the source device. |
| Volume number differs from the amplifier app | Fader-curve rounding | Small deviations (±2) are normal; the dB value shown next to it is authoritative — it comes straight from the amplifier. |
| “Invalid settings – not saved” | Faulty input (e.g. IP address) | Follow the red message; for static IP, address, mask and gateway must all be valid. |
| Update fails | No internet, NTP missing, server unreachable | Read the “Result” field in the firmware section. Ensure internet access and a green NTP dot, then “Check now” again. |
| Old version running again after an update | Automatic rollback after failed boots | Intentional: the new version is blocked as faulty (red notice). Wait for the next release or deliberately reinstall manually. |
| Restart notice does not disappear | IP configuration changed, device not yet restarted | Use the restart button right next to the notice. |
| CSV import fails | Format/columns modified | “Import failed – check the file”. Keep the column headers and format from chapter 11; best start from a fresh export. |
| Full reset | — | Re-flash the firmware via USB (erases schedules, settings and colors). Export a CSV first! |
If nothing helps: take screenshots of the overview (System & Diagnostics) and the logs and send them to support (address below).
13. Technical data
| Hardware | ESP32 module with Ethernet (e.g. Olimex ESP32-POE-ISO) |
| Power | PoE IEEE 802.3af or 5 V via USB |
| Network | Ethernet 10/100 Mbit/s, IPv4; DHCP, static IP, or DHCP fallback 192.168.64.123 |
| Access | HTTP port 80, hostname esp-audio-scheduler.local (mDNS) |
| Amplifier protocol | Pascal Audio “Open API for Installers”, TCP port 7621; amplifier discovery via mDNS _pasconnect._tcp |
| Zones | up to 8 (A–H, detected automatically per model; unused zones are hidden); names/limits/inputs are read from the amplifier |
| Events | max. 100; minute-precise, weekday-based |
| Fades | 0–∞ seconds, separate for on, off and volume changes (defaults 3/5/3 s) |
| Time base | NTP (pool.ntp.org / time.nist.gov), Central European timezone incl. DST; alternatively a manually set clock (lost on restart) |
| Updates | OTA via HTTPS (GitHub releases), user-triggered, firmware + interface together, automatic rollback protection |
| Languages | German, English |
14. Legal
© 2026 Marcello Alte · All rights reserved.
Contact & support: marcello.alte [at] elektroakustik-alte [dot] de (Impressum)
Open-source components: The firmware and web interface include open-source components under their respective licenses — Alpine.js © Caleb Porzio (MIT), Tailwind CSS © Tailwind Labs (MIT), ArduinoJson © Benoit Blanchon (MIT), ESPAsyncWebServer and AsyncTCP (LGPL-3.0), Arduino core for ESP32 (LGPL-2.1), ESP-IDF (Apache-2.0), littlefs (BSD-3-Clause). The complete list with copyright notices and license texts accompanies every software release as THIRD_PARTY_LICENSES.md and is also linked from the web interface (footer of the settings page). The LGPL libraries are used unmodified; their sources are freely available from the repositories named there.
Warranty: The software is provided without warranty of particular characteristics; for open-source components, warranty terms follow their licenses (provided “as is”).
“Blaze Audio”, “PASCAL”, “Sonance” and mentioned product names are trademarks of their respective owners. This product is not affiliated with those manufacturers; it uses their publicly documented control interface.